Serverless auth
• 26 min read
Protecting AWS API Gateway endpoints with AWS Lambda and Auth0.
Auth is complicated. It can be difficult to reason about and can be hard to work with. The terminology can be complex as well, and terms are sometimes used interchangeably or can be ambiguous. Like saying “auth” to refer both to authentication (who are you?) and authorization (I know who you are, but what are you allowed to do?).
On top of that it can also be challenging to know when to use what. Depending on what you’re building and for whom, different auth protocols and strategies might be more suitable or required.
In this post I won’t be exploring these protocols and strategies in depth. Instead, I want to show that implementing something as complex as auth doesn’t have to be too difficult. In order to do that I’ll focus on a specific (but common) use case, and show a way to implement it.
If you just want to read the code, have a look at github.com/danillouz/serverless-auth.
Use case and technologies
How can we secure an HTTP API with a token based authentication strategy, so only authenticated and authorized clients can access it?
More specifically:
- The HTTP API is an AWS API Gateway (APIG).
- The API endpoints are protected with a bearer token and implemented as Lambda Proxy Integrations.
- Auth0 is used as a third-party auth provider.
- An APIG Lambda Authorizer is used to verify the token with Auth0.
- The Lambdas are implemented using Node.js and the Serverless Framework.
- curl is used as a “client” to send HTTP requests to the API with a token.
Why use a third-party auth provider?
I’ll be using Auth0 as a third-party auth provider. This means that I’m choosing not to build (nor operate!) my own “auth server”. So before we get started, I think it’s important to explain the motivation behind this decision.
In order to build an auth server you could use:
- OAuth 2.0: an authorization protocol.
- OpenID Connect (OIDC): an authentication protocol. This is an “identity layer” built on top of OAuth 2.0.
- Token based authentication: a strategy that requires a client to send a signed bearer token when making requests to a protected API. The API will only respond to requests successfully when it receives a verified token.
- JSON Web Token (JWT): a way to send auth information (i.e. “claims”) as JSON. A JWT contains a
Header,PayloadandSignaturewhich are Base64 encoded and separated by a period. In effect, a JWT can be used as a bearer token1.
And with perhaps the help of some other tools and libraries you might be confident enough to build an auth server yourself. But I think that in most cases you shouldn’t go down this route2. Why not? Because it will cost a lot of time, energy and money to build, operate and maintain it.
If you do have a valid use case, plus enough resources, time and knowledge to build your own auth server, it might make sense for you. But I think that in most cases you should use a third party auth provider instead. Like AWS Cognito or Auth0.
Third-party auth providers give you all the fancy tooling, scalable infrastructure and resources you will need to provide a secure, reliable, performant and usable solution. Sure, you’ll have to pay for it. But I think the pricing is typically fair. And it will most likely be a small fraction of what it would cost when you’d roll your own solution.
Another sometimes overlooked benefit of choosing “buy over build”, is that you’ll get access to the domain expert’s knowledge. Where they can advise and help you choose the best auth strategy for your use case.
And last but not least. By having someone else deal with the complexities and challenges of auth, you can focus on building your product!
Okay, let’s get started.
What will we build?
We’ll build an Account API with a single endpoint that returns some profile information for a user.
Requirements and constraints are:
- The endpoint will be
GET /profile. - The business logic of the endpoint will be implemented by a Lambda handler:
- The Lambda will return data as JSON.
- The Lambda will return a single property
namewith valueDaniël. - The Lambda will return HTTP status code
200.
- The endpoint will require a bearer token to return the profile data.
- The token will be sent via the
Authorizationrequest header. - The
Authorizationrequest header value must have the format:Bearer <TOKEN>. - The token is verified by a Lambda Authorizer with the help of Auth0.
- The token will be sent via the
This API isn’t very useful, but gives us something to work with in order to implement auth.
Example
GET /profile
Authorization: Bearer eyJ...lKw200 OK
Content-Type: application/json
{
"name": "Daniël"
}Registering the API with Auth0
When the Account API receives a request with the bearer token, it will have to verify the token with the help of Auth0. In order to do that, we first have to register our API with them:
- Sign up and setup your tenant.
- In the Auth0 dashboard, navigate to “APIs” and click on “Create API”.
- Follow the instructions and provide a “Name” and “Identifier”. For example
Account APIandhttps://api.danillouz.dev/account3. - Use
RS256as the signing algorithm (more on that later). - Click on “Create”.
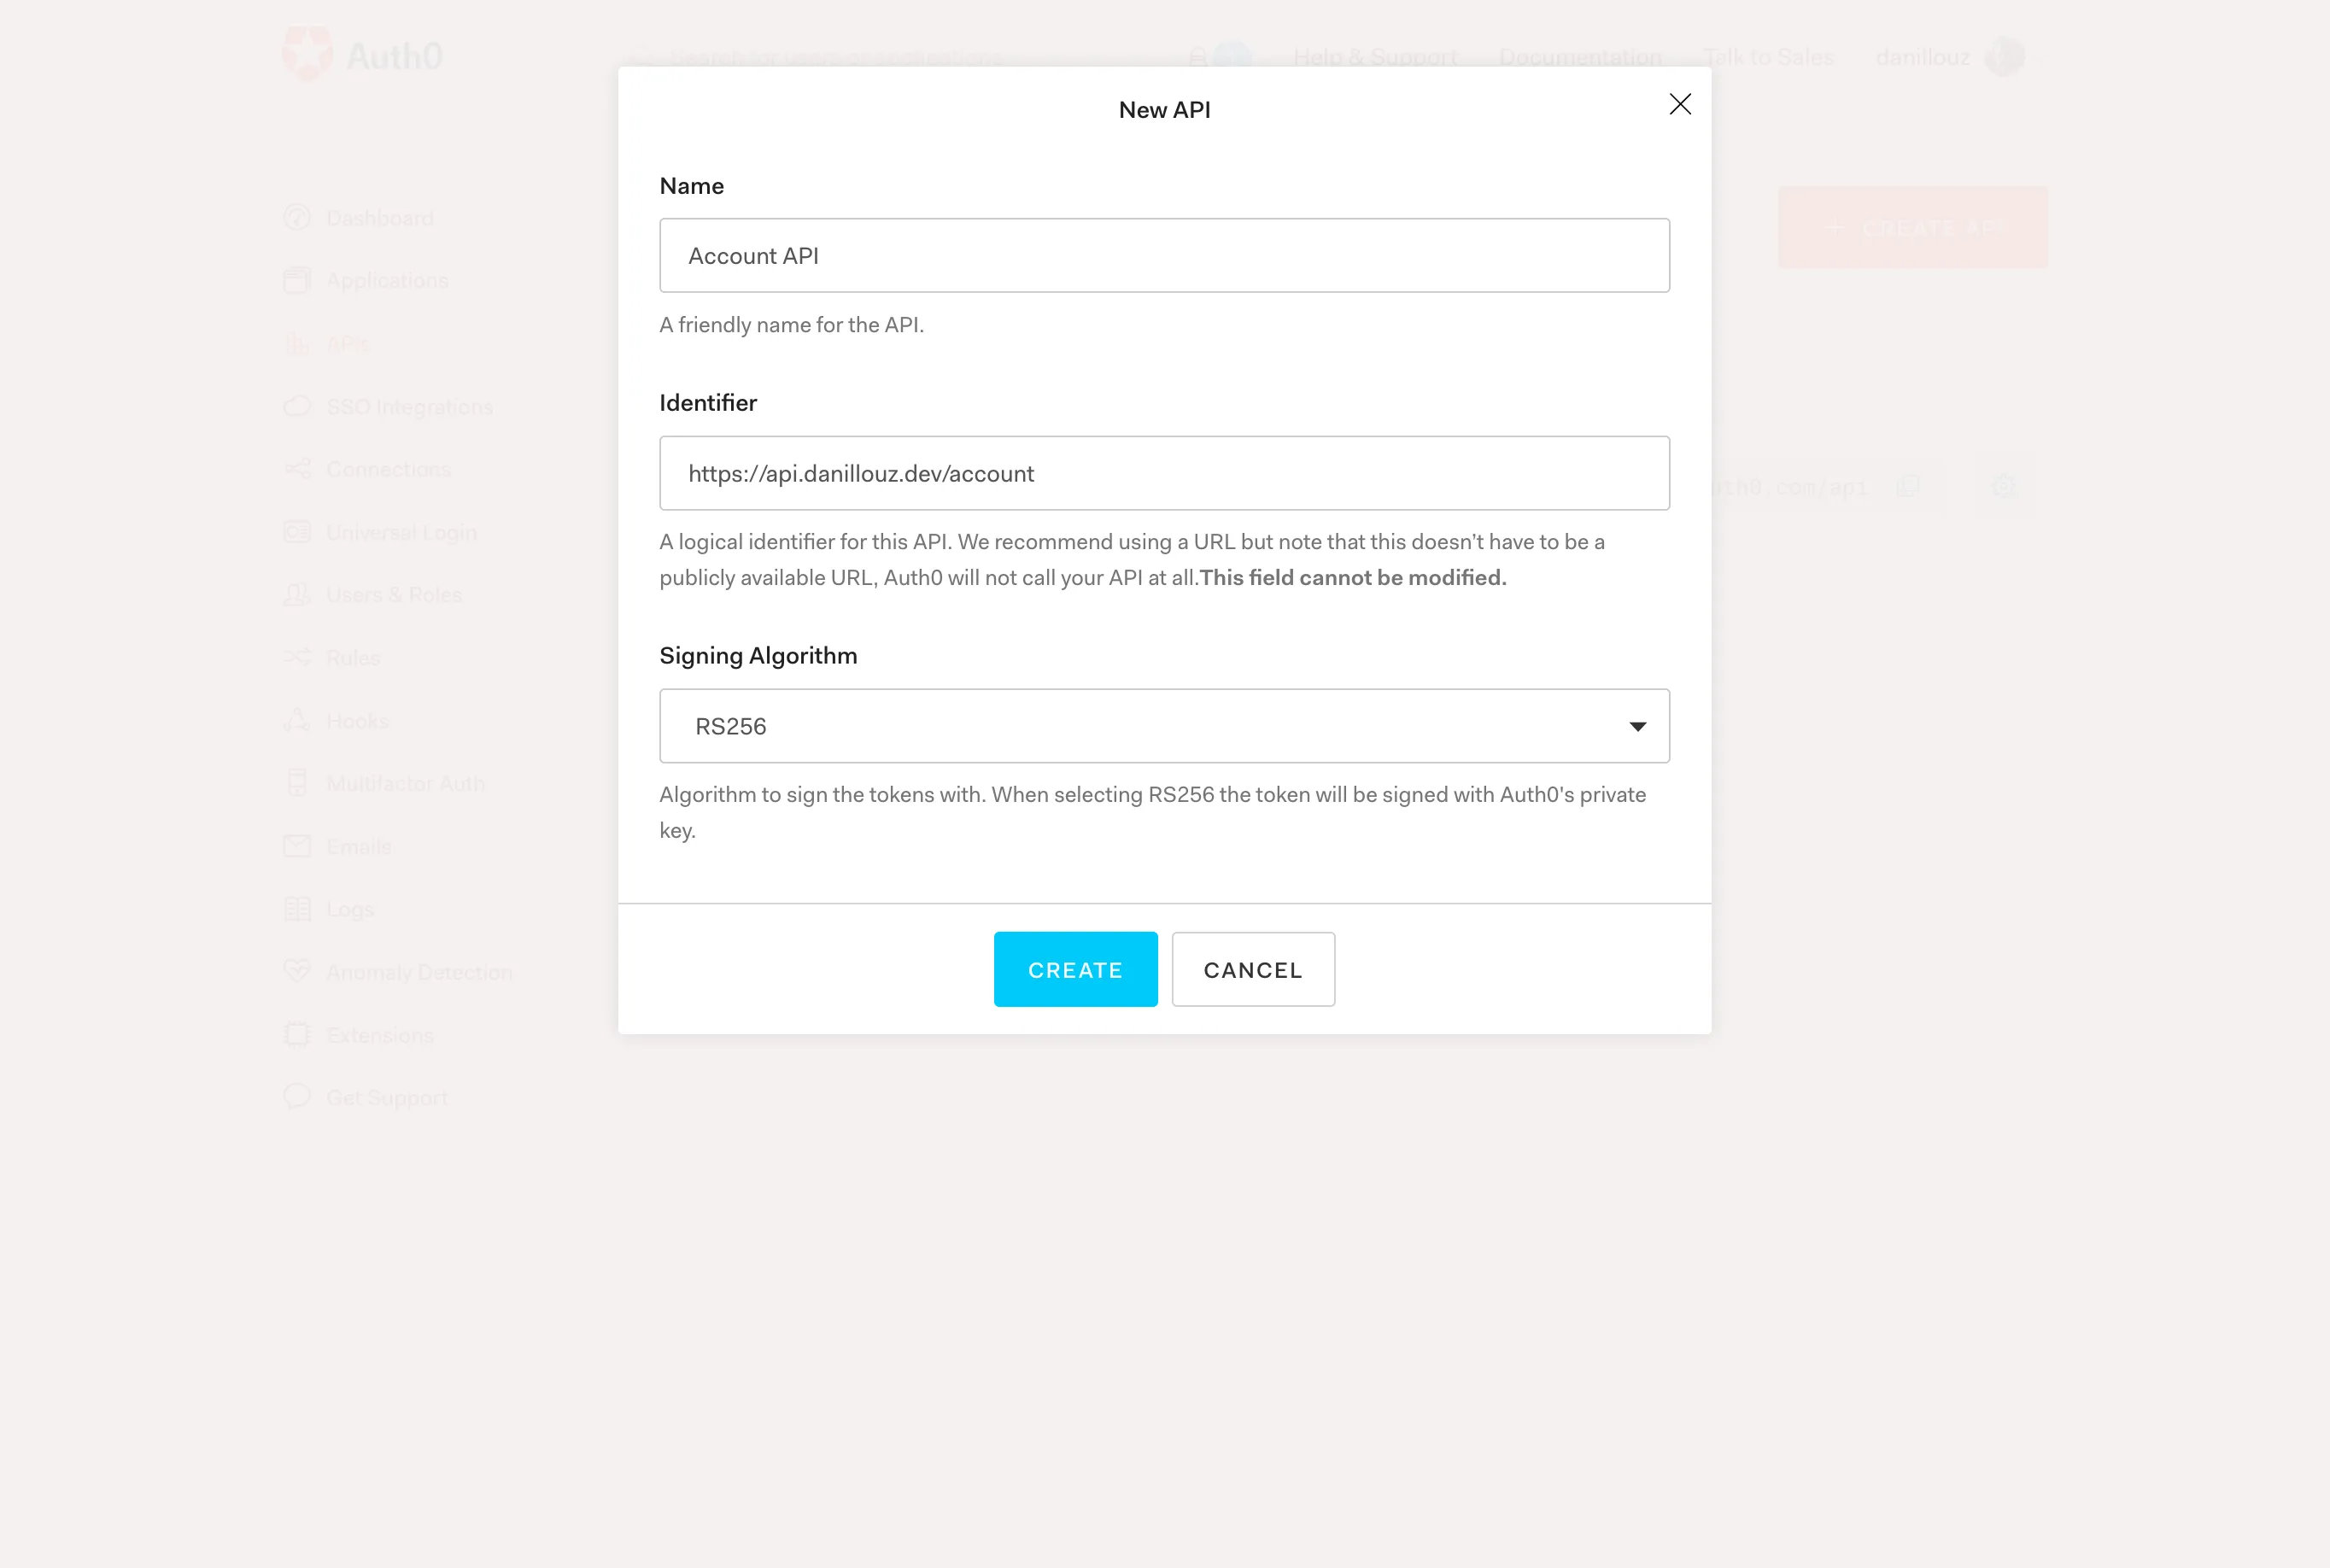
Register you API with Auth0 by providing a name, identifier and signing algorithm.
Lambda Authorizer configuration
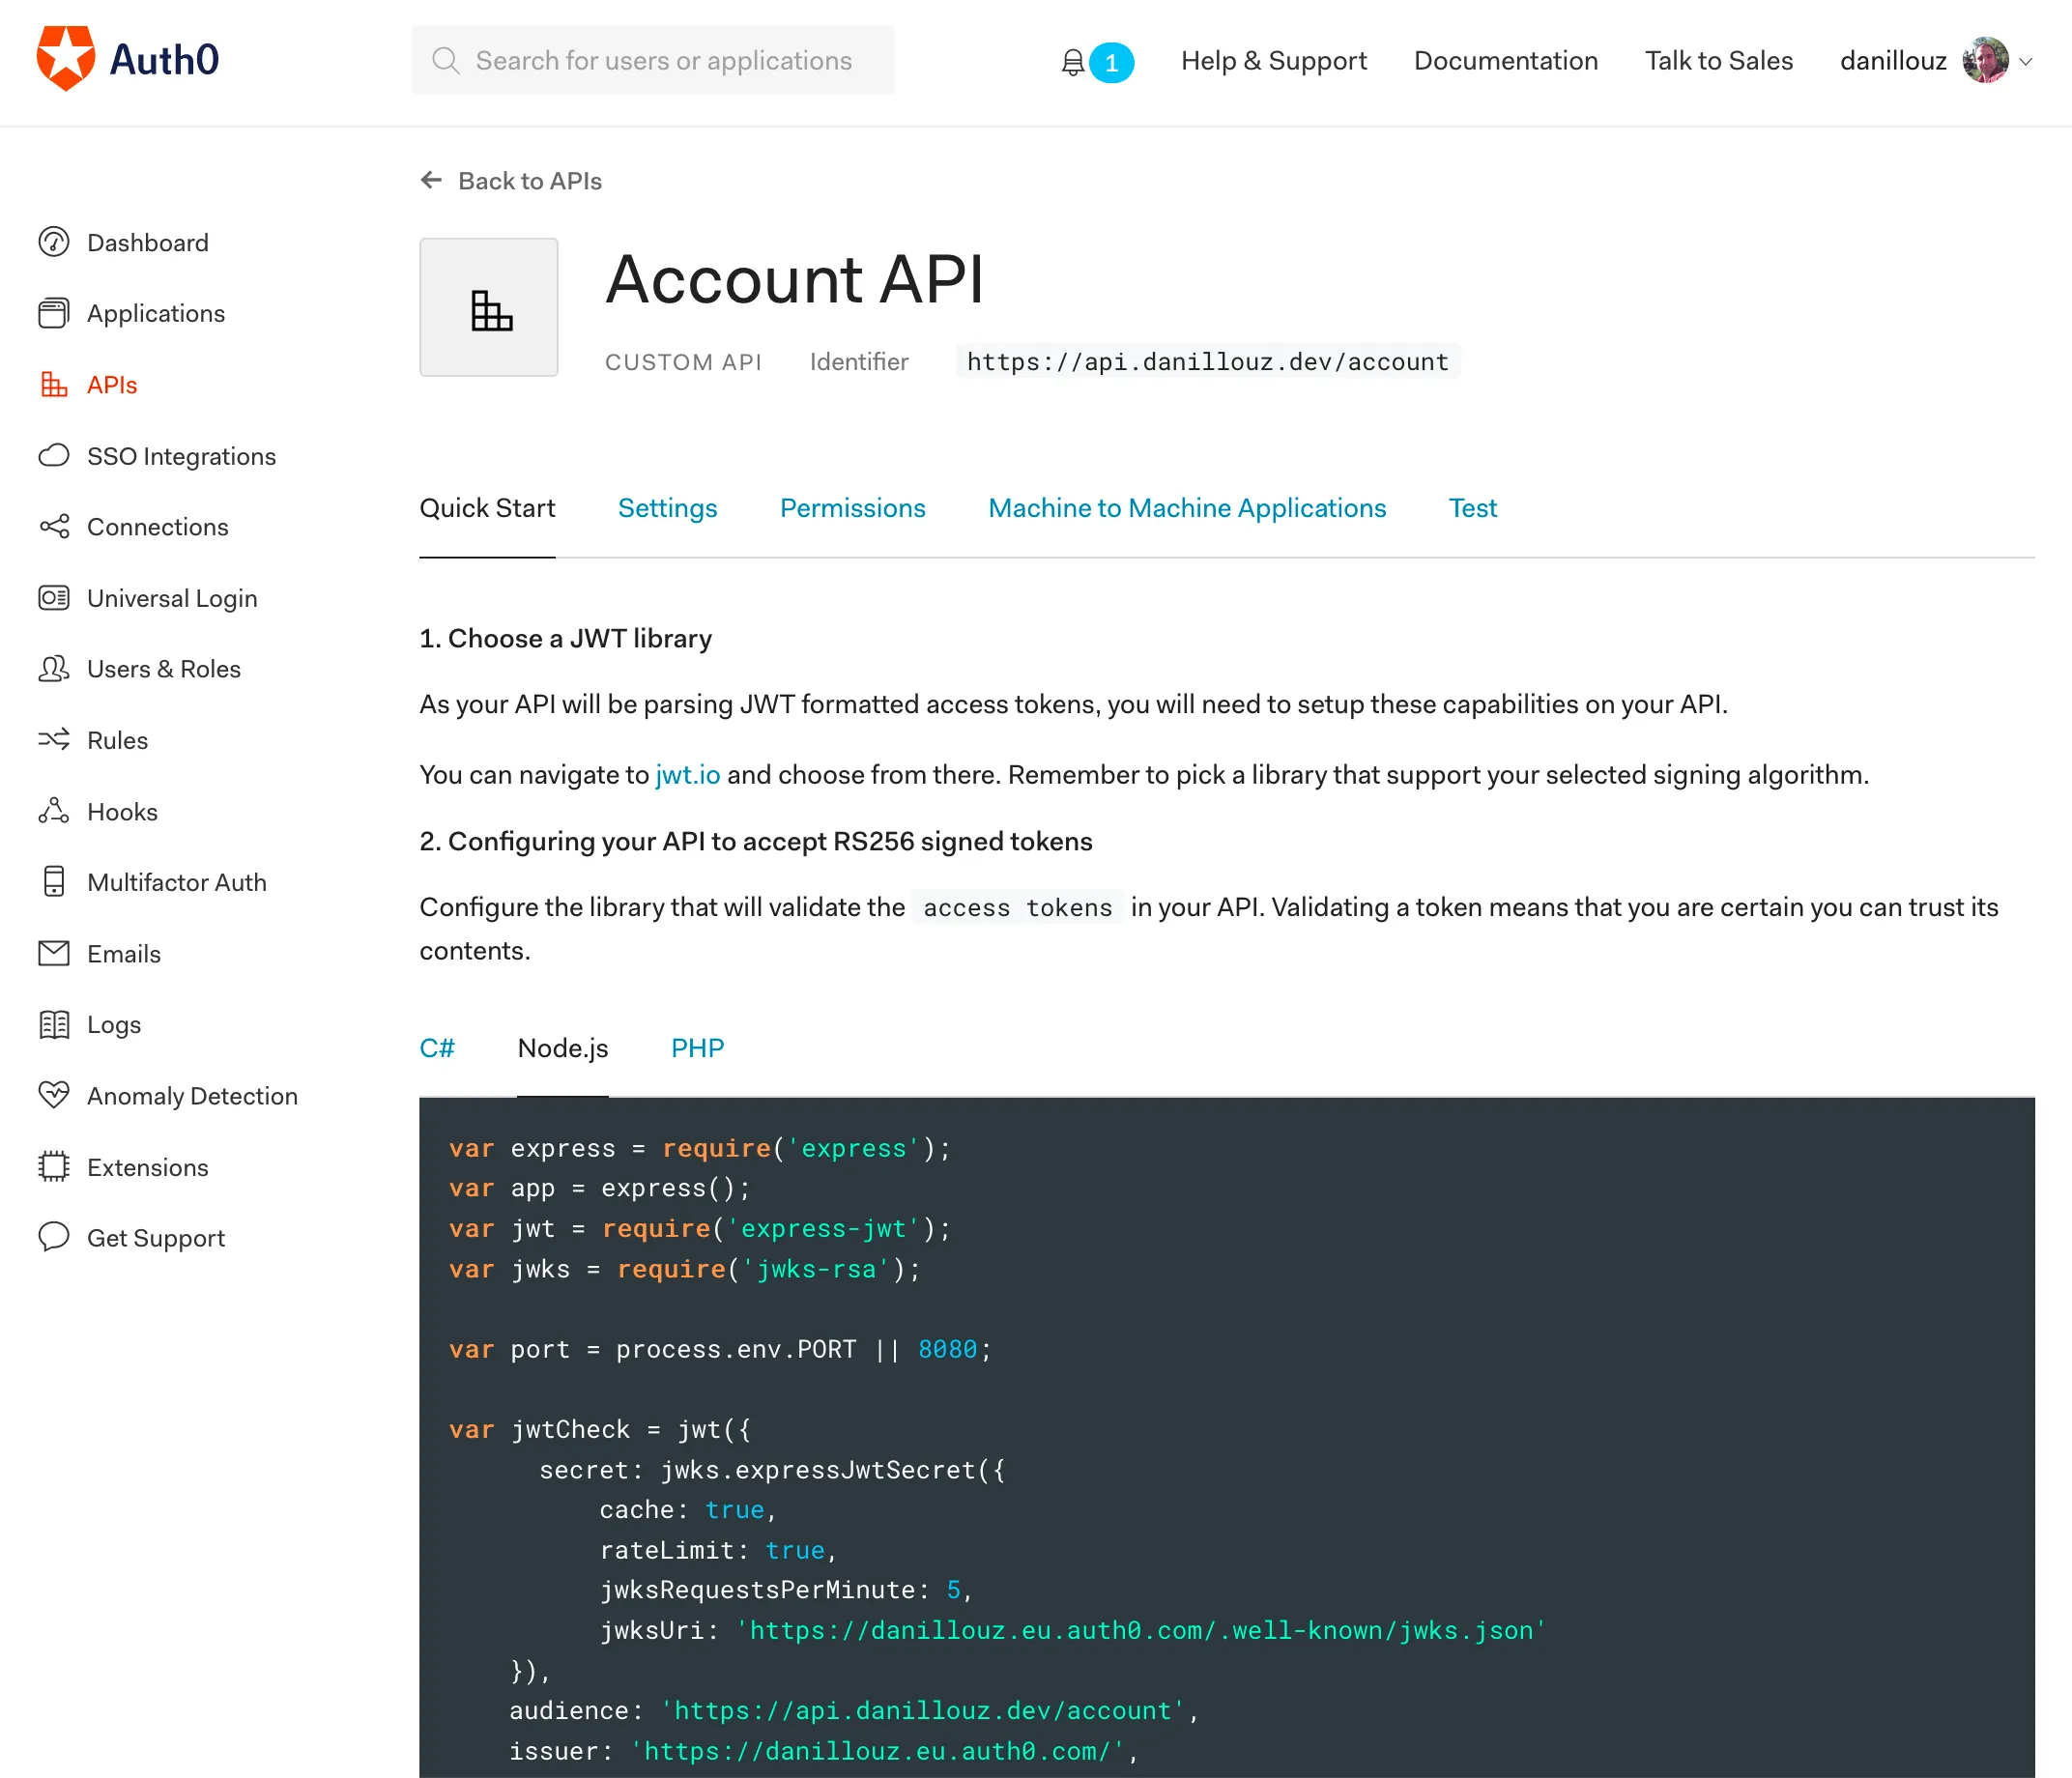
Now that our API is registered, we need to take note of the following (public) properties, to later on configure our Lambda Authorizer:
- Token issuer: this is basically your Auth0 tenant. It always has the format
https://TENANT_NAME.REGION.auth0.com. For examplehttps://danillouz.eu.auth0.com. - JWKS URI: this returns a JSON Web Key Set (JWKS). The URI will be used by the Lambda Authorizer to fetch a public key from Auth0 and verify a token (more on that later). It always has the format
https://TENANT_NAME.REGION.auth0.com/.well-known/jwks.json. For examplehttps://danillouz.eu.auth0.com/.well-known/jwks.json. - Audience: this is the “Identifier” you provided during step 3 of registering the API with Auth0. For example
https://api.danillouz.dev/account.
You can also find these values under the “Quick Start” tab of the API details screen (you were redirected there after registering the API). For example, click on the “Node.js” tab and look for these properties:
issuerjwksUriaudience
What’s a Lambda Authorizer?
I haven’t explained what a Lambda Authorizer is yet. In short, it’s a feature of APIG to control access to an API.
A Lambda authorizer is useful if you want to implement a custom authorization scheme that uses a bearer token authentication strategy such as OAuth.
There are actually two types of Lambda Authorizers:
- Token based authorizers.
- Request parameter based authorizers.
We’ll be using the token based authorizer, because that supports bearer tokens.
What should it do?
When a Lambda Authorizer is configured, and a client makes a request to APIG, AWS will invoke the Lambda Authorizer first (i.e. before the Lambda handler). The Lambda Authorizer must then extract the bearer token from the Authorization request header and validate it by:
- Fetching the JWKS (which contains the public key) from Auth0 using the JWKS URI4.
- Verifying the token signature with the fetched public key.
- Verifying the token has the correct issuer and audience claims.
Only when the token passes these checks should the Lambda Authorizer return an IAM Policy document with "Effect" set to "Allow":
{
"Version": "2012-10-17",
"Statement": [
{
"Action": "execute-api:Invoke",
"Effect": "Allow",
"Resource": "ARN_OF_LAMBDA_HANDLER"
}
]
}It’s this policy that tells APIG it’s allowed to invoke our downstream Lambda handler. In our case that will be the Lambda handler that returns the profile data.
Alternatively, the Lambda authorizer may deny invoking the downstream handler by setting "Effect" to "Deny":
{
"Version": "2012-10-17",
"Statement": [
{
"Action": "execute-api:Invoke",
"Effect": "Deny",
"Resource": "ARN_OF_LAMBDA_HANDLER"
}
]
}This will make APIG respond with 403 Forbidden. To make APIG respond with 401 Unauthorized, return an Unauthorized error from the Lambda Authorizer. We’ll see this in action when implementing the Lambda Authorizer.
A note on authorization
I found it good practice to only authenticate the caller from the Lambda Authorizer and apply authorization logic downstream (i.e. in the Lambda handlers).
This may not be feasible in all use cases, but doing this keeps the Lambda Authorizer simple. So I think that ideally the Lambda Authorizer is only responsible for:
- Verifying the token.
- Propagating authorization information downstream.
The downstream Lambda handler can then use the authorization information to decide if it should execute its business logic for the specific caller or not.
Following this design also leads to a nice decoupling between the authentication and authorization logic (i.e. between the Lambda Authorizer and Lambda handlers).
Scopes
When using OAuth 2.0, scopes can be used to apply authorization logic. In our case we could have a get:profile scope. And a Lambda handler can check if the caller has been authorized to perform the action that is represented by the scope. If the scope is not present, the Lambda handler can return a 403 Forbidden response back to the caller.
You can configure scope in the Auth0 dashboard by adding permissions to the registered API. Navigate to the “Permissions” tab of the API details screen and add get:profile as a scope.
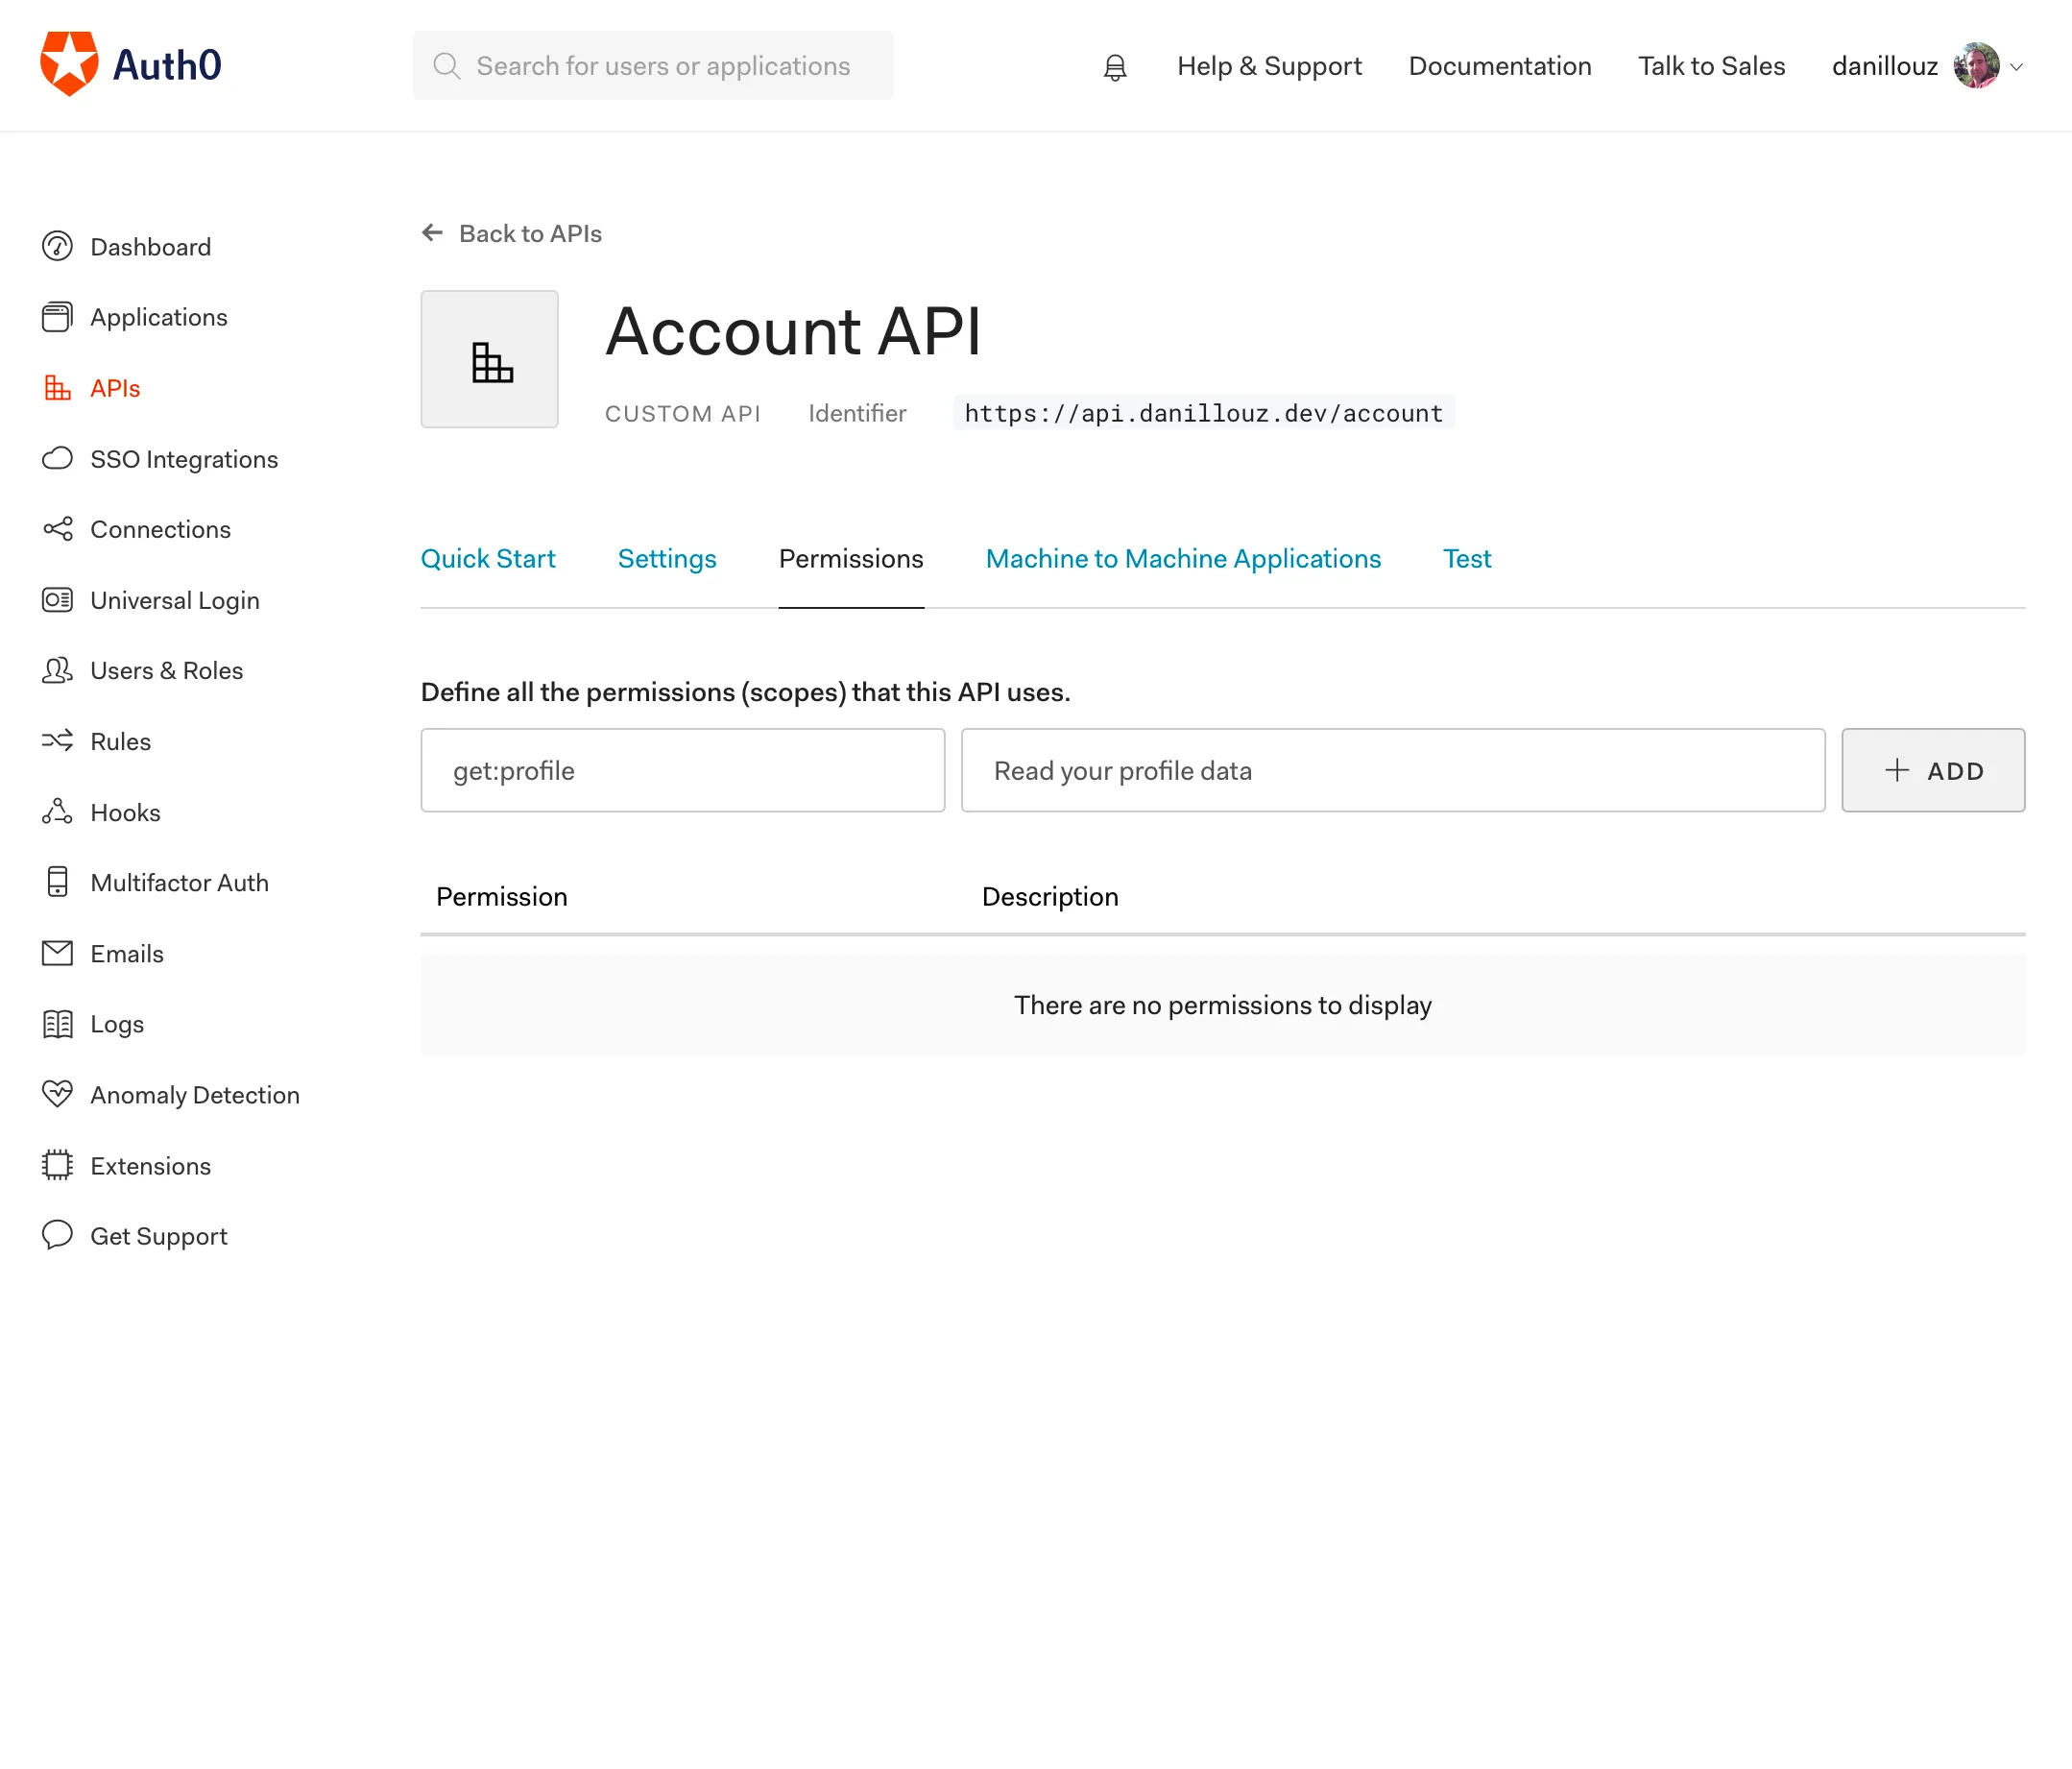
We’ll use this scope when implementing the Account API. And you can read more about scopes in the Auth0 docs.
Context
You can propagate authorization information (like scopes) downstream by returning a context object in the Lambda Authorizer’s response:
"use strict"
module.exports.authorizer = (event) => {
const authResponse = {
principalId: "UNIQUE_ID",
policyDocument: {
Version: "2012-10-17",
Statement: [
{
Action: "execute-api:Invoke",
Effect: "Allow",
Resource: event.methodArn,
},
],
},
context: {
scope: "get:profile",
},
}
return authResponse
}But there’s a caveat here. You can not set a JSON serializable object or array as a valid value of any key in the context object. It can only be a String, Number or Boolean:
context: {
a: 'value', // ✅ OK
b: 1, // ✅ OK
c: true, // ✅ OK
d: [9, 8, 7], // ❌ Will NOT be serialized
e: { x: 'value', y: 99, z: false } // ❌ Will NOT be serialized
}Any “valid” properties passed to the context object will be made available to downstream Lambda handlers via the event object:
"use strict"
module.exports.handler = (event) => {
const { authorizer } = event.requestContext
console.log(authorizer.scope) // "get:profile"
}Solidifying our mental model
With that covered, we’re ready to build the Lambda Authorizer and the Account API. But before we do, let’s take a step back and solidify our mental model first.
To summarize, we need the following components to protect our API:
- Auth0 as the third-party auth provider to issue and help verify bearer tokens.
- APIG to represent the Account API.
- A Lambda Authorizer to verify tokens with Auth0.
- A Lambda handler for the
GET /profileendpoint to return the profile data. curlas the client to send HTTP requests to the API with a token.
We can visualize how these components will interact with each other like this.
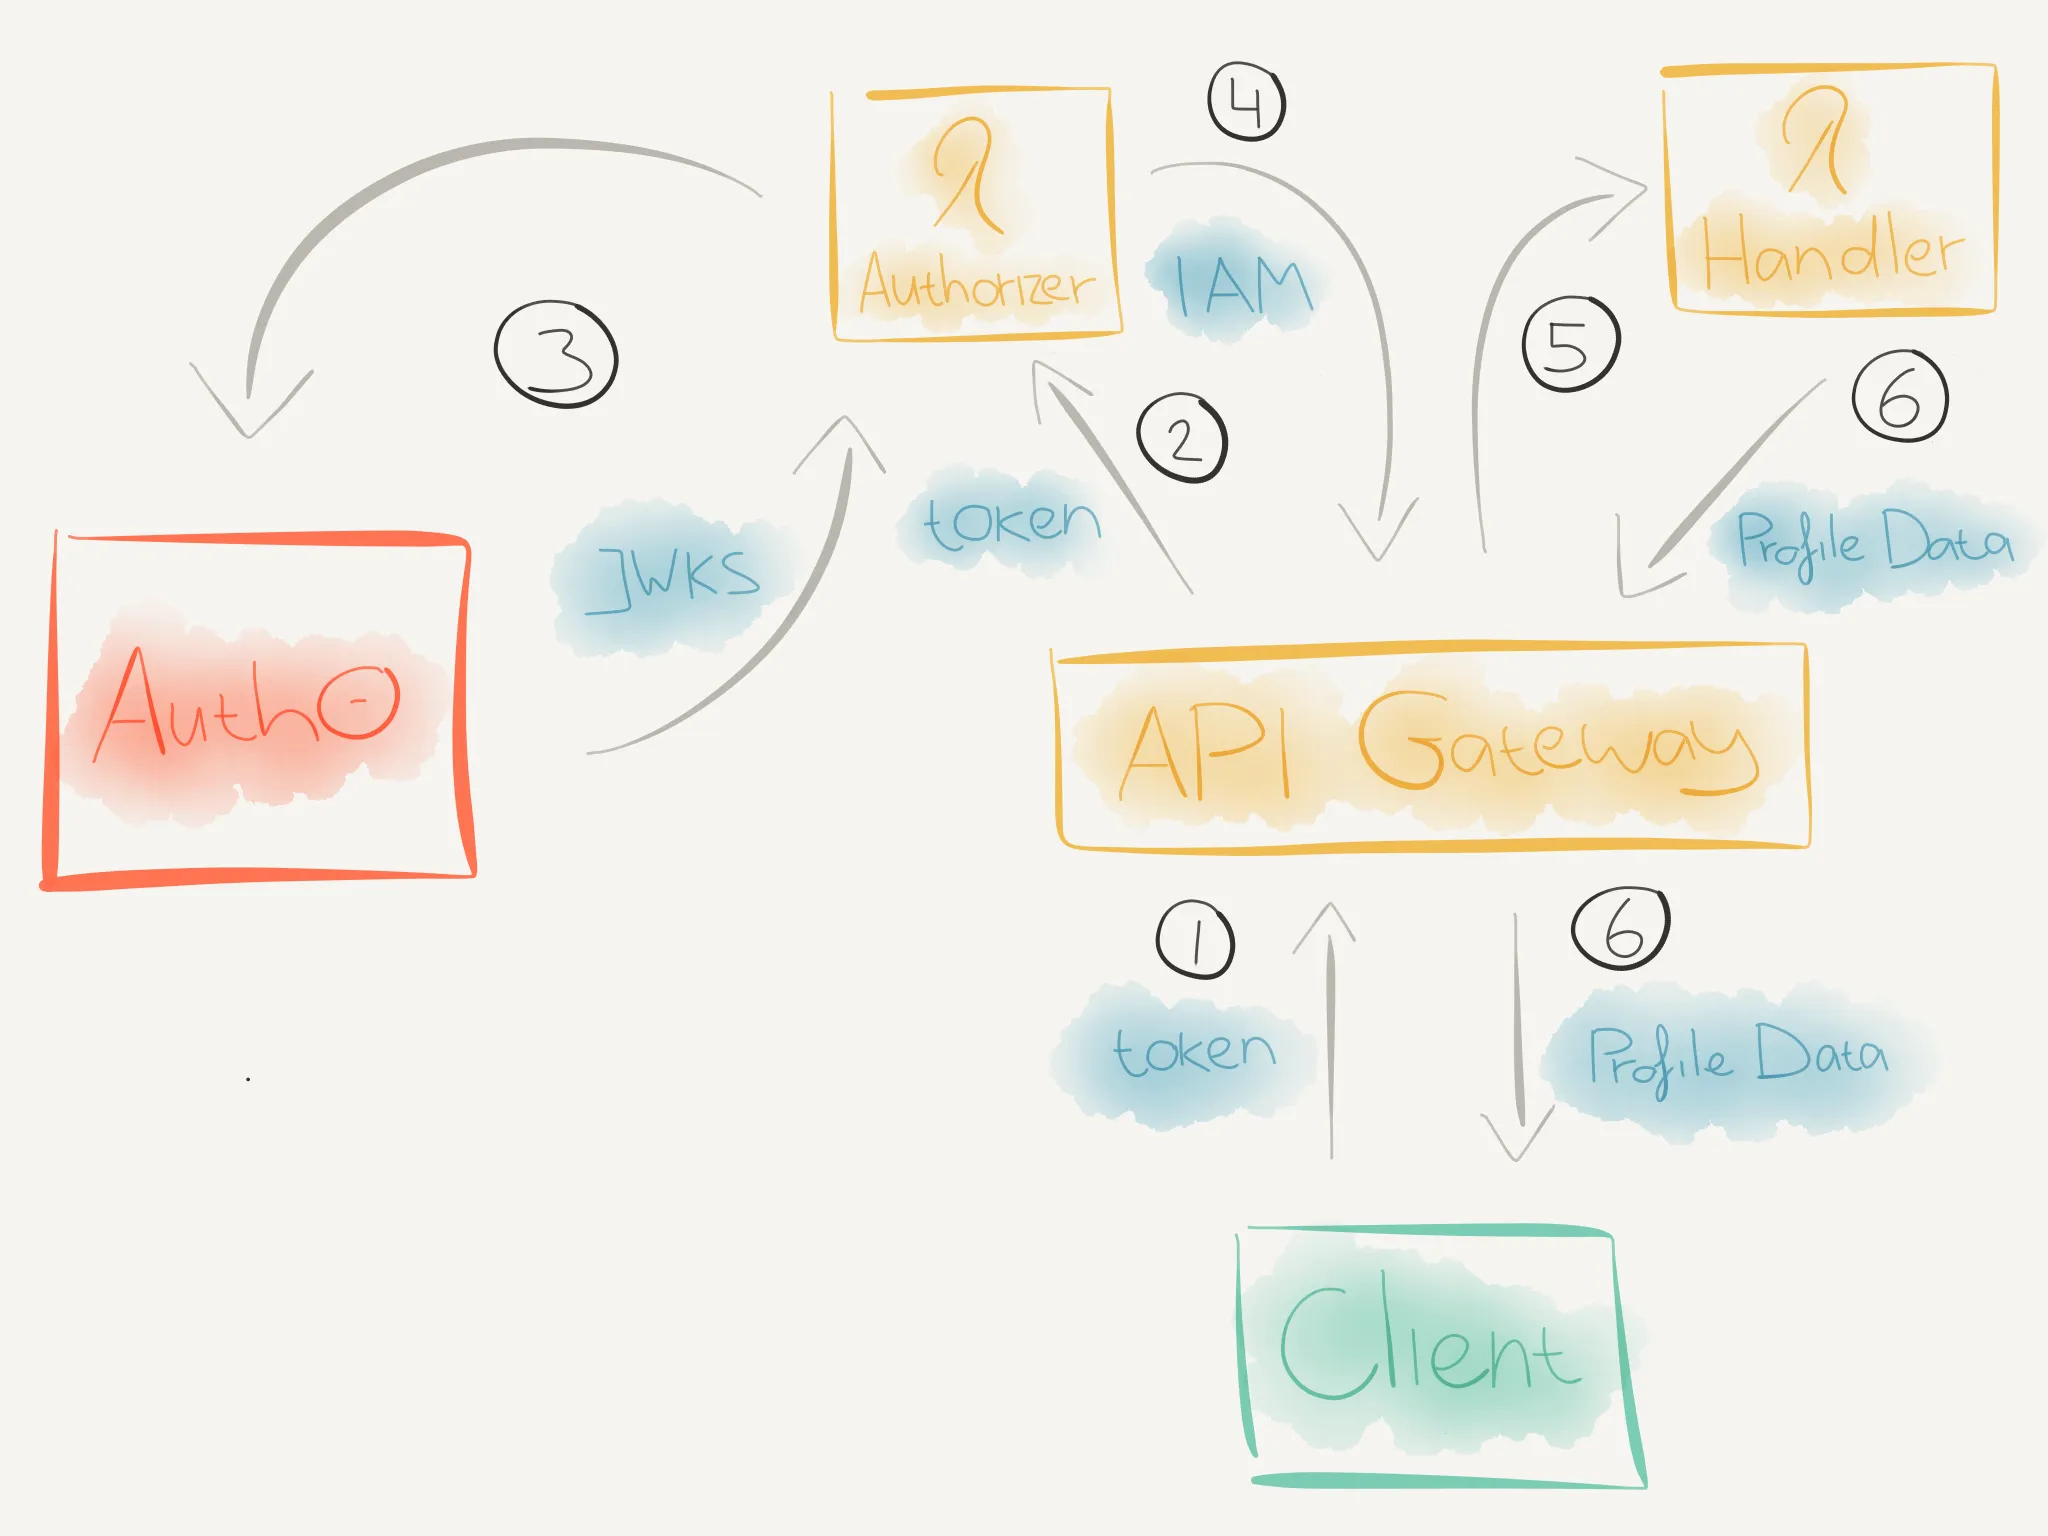
-
curlwill send an HTTP request to theGET /profileendpoint with a token via theAuthorizationrequest header. -
When the HTTP request reaches APIG, it will check if a Lambda Authorizer is configured for the called endpoint. If so, APIG will invoke the Lambda Authorizer.
-
The Lambda Authorizer will then:
- Extract the token from the
Authorizationrequest header. - Fetch the JWKS (which contains the public key) from Auth0.
- Verify the token signature with the fetched public key.
- Verify the token has the correct issuer and audience claims.
-
If the token is verified, the Lambda Authorizer will return an IAM Policy document with
Effectset toAllow. -
APIG will now evaluate the IAM Policy and if the
Effectis set toAllow, it will invoke the specified Lambda handler. -
The Lambda handler will execute and when the
get:profilescope is present, it will return the profile data back to the client.
Now for the easy part, writing the code!
Implementing the Lambda Authorizer
We’ll do this by:
- Setting up the project
- Configuring a Serverless manifest
- Defining the Lambda Authorizer
- Getting the token
- Verifying the token
- Creating the auth response
- Releasing the Lambda Authorizer
1. Setting up the project
Create a new directory for the code:
mkdir lambda-authorizersMove to this directory and initialize a new npm project with:
npm init -yThis creates a package.json file. Now you can install the following required npm dependencies:
npm i jsonwebtoken jwks-rsaThe jsonwebtoken library will help use decode the bearer token (a JWT) and verify its signature, issuer and audience claims. The jwks-rsa library will help us fetch the JWKS from Auth0.
We’ll use the Serverless Framework to configure and upload the Lambda to AWS, so install it as a dev dependency:
npm i -D serverless2. Configuring a Serverless manifest
Create a Serverless manifest:
service: lambda-authorizers
provider:
name: aws
runtime: nodejs8.10
stage: ${opt:stage, 'prod'}
region: ${opt:region, 'eu-central-1'}
memorySize: 128
timeout: 3
package:
exclude:
- ./*
- ./**/*.test.js
include:
- node_modules
- srcAdd the properties we got from the Lambda Authorizer configuration as environment variables. For example:
service: lambda-authorizers
provider:
name: aws
runtime: nodejs8.10
stage: ${opt:stage, 'prod'}
region: ${opt:region, 'eu-central-1'}
memorySize: 128
timeout: 3
environment:
JWKS_URI: "https://danillouz.eu.auth0.com/.well-known/jwks.json"
TOKEN_ISSUER: "https://danillouz.eu.auth0.com/"
AUDIENCE: "https://api.danillouz.dev/account"
package:
exclude:
- ./*
- ./**/*.test.js
include:
- node_modules
- srcAnd add the Lambda function definition:
service: lambda-authorizers
provider:
name: aws
runtime: nodejs8.10
stage: ${opt:stage, 'prod'}
region: ${opt:region, 'eu-central-1'}
memorySize: 128
timeout: 3
environment:
JWKS_URI: "https://danillouz.eu.auth0.com/.well-known/jwks.json"
TOKEN_ISSUER: "https://danillouz.eu.auth0.com/"
AUDIENCE: "https://api.danillouz.dev/account"
package:
exclude:
- ./*
- ./**/*.test.js
include:
- node_modules
- src
functions:
auth0VerifyBearer:
handler: src/auth0.verifyBearer
description: Verifies the bearer token with the help of Auth03. Defining the Lambda Authorizer
In order to match the Lambda function definition in the Serverless manifest, create a file named auth0.js in src. And in that file export a method named verifyBearer:
"use strict"
module.exports.verifyBearer = async () => {
try {
// Lambda Authorizer implementation goes here.
} catch (err) {
console.log("Authorizer Error: ", err)
throw new Error("Unauthorized")
}
}If something goes wrong in the Lambda, we’ll log the error and throw a new Unauthorized error. This will make APIG return a 401 Unauthorized response back to the caller5.
4. Getting the token
The Lambda will first have to get the bearer token from the Authorization request header. Create a helper function for that in src/get-token.js. And in that file export a function named getToken:
"use strict"
module.exports = function getToken(event) {
if (event.type !== "TOKEN") {
throw new Error('Authorizer must be of type "TOKEN"')
}
const { authorizationToken: bearer } = event
if (!bearer) {
throw new Error('Authorization header with "Bearer TOKEN" must be provided')
}
const [, token] = bearer.match(/^Bearer (.*)$/) || []
if (!token) {
throw new Error("Invalid bearer token")
}
return token
}Here we’re only interested in TOKEN events because we’re implementing a token based authorizer. And we can access the value of the Authorization request header via the event.authorizationToken property.
Then require and call the helper in the Lambda with the APIG HTTP input event as an argument:
"use strict"
const getToken = require("./get-token")
module.exports.verifyBearer = async (event) => {
try {
const token = getToken(event)
} catch (err) {
console.log("Authorizer Error: ", err)
throw new Error("Unauthorized")
}
}5. Verifying the token
Now we have the token, we need to verify it by:
- Decoding the bearer token (JWT).
- Fetching the public key from Auth0 using the JWKS URI (used to verify the token signature).
- Verifying the token signature, issuer and audience claims.
We’ll use another helper function for this. Create one in src/verify-token.js, and export a function named verifyToken:
"use strict"
module.exports = async function verifyToken(
token,
decodeJwt,
getSigningKey,
verifyJwt,
issuer,
audience
) {
// Step 1.
const decoded = decodeJwt(token, { complete: true })
if (!decoded || !decoded.header || !decoded.header.kid) {
throw new Error("Invalid JWT")
}
// Step 2.
const { publicKey, rsaPublicKey } = await getSigningKey(decoded.header.kid)
const signingKey = publicKey || rsaPublicKey
// Step 3.
return verifyJwt(token, signingKey, {
issuer,
audience,
})
}After we decode the token with the option { complete: true }, we can access the JWT header data. And by using the kid JWT claim, we can find out which key was used to sign the token.
When we registered the API with Auth0 we chose the RS256 signing algorithm. This algorithm generates an asymmetric signature. Which basically means that Auth0 uses a private key to sign a JWT when it issues one. And we can use a public key (fetched via the JWKS URI) to verify the authenticity of the token.
First require the helper in the Lambda and pass the token as the first argument when calling it:
"use strict"
const getToken = require("./get-token")
const verifyToken = require("./verify-token")
module.exports.verifyBearer = async (event) => {
try {
const token = getToken(event)
const verifiedData = await verifyToken(token)
} catch (err) {
console.log("Authorizer Error: ", err)
throw new Error("Unauthorized")
}
}To decode the token in the helper (step 1), we’ll use the jsonwebtoken library. It exposes a decode method. Pass this method as the second argument when calling the helper:
"use strict"
const jwt = require("jsonwebtoken")
const getToken = require("./get-token")
const verifyToken = require("./verify-token")
module.exports.verifyBearer = async (event) => {
try {
const token = getToken(event)
const verifiedData = await verifyToken(token, jwt.decode)
} catch (err) {
console.log("Authorizer Error: ", err)
throw new Error("Unauthorized")
}
}To fetch the public key from Auth0 (step 2) we’ll use the jwks-rsa library. It exposes a client with getSigningKey method to fetch the key. Pas a “promisified” version of this method as the third argument when calling the helper:
"use strict"
const util = require("util")
const jwt = require("jsonwebtoken")
const jwksRSA = require("jwks-rsa")
const getToken = require("./get-token")
const verifyToken = require("./verify-token")
const { JWKS_URI } = process.env
const jwksClient = jwksRSA({
cache: true,
rateLimit: true,
jwksUri: JWKS_URI,
})
const getSigningKey = util.promisify(jwksClient.getSigningKey)
module.exports.verifyBearer = async (event) => {
try {
const token = getToken(event)
const verifiedData = await verifyToken(token, jwt.decode, getSigningKey)
} catch (err) {
console.log("Authorizer Error: ", err)
throw new Error("Unauthorized")
}
}Finally, to verify the token signature, issuer and audience claims (step 3) we’ll use the jsonwebtoken library again. It exposes a verify method. Pass a “promisified” version of this method together with the TOKEN_ISSUER and AUDIENCE as the final arguments when calling the helper:
"use strict"
const util = require("util")
const jwt = require("jsonwebtoken")
const jwksRSA = require("jwks-rsa")
const getToken = require("./get-token")
const verifyToken = require("./verify-token")
const { JWKS_URI, TOKEN_ISSUER, AUDIENCE } = process.env
const jwksClient = jwksRSA({
cache: true,
rateLimit: true,
jwksUri: JWKS_URI,
})
const getSigningKey = util.promisify(jwksClient.getSigningKey)
const verifyJwt = util.promisify(jwt.verify)
module.exports.verifyBearer = async (event) => {
try {
const token = getToken(event)
const verifiedData = await verifyToken(
token,
jwt.decode,
getSigningKey,
verifyJwt,
TOKEN_ISSUER,
AUDIENCE
)
} catch (err) {
console.log("Authorizer Error: ", err)
throw new Error("Unauthorized")
}
}When the helper verifies the token, it will return the JWT payload data (with all claims) as verifiedData. For example:
{
"iss": "https://danillouz.eu.auth0.com/",
"sub": "FHgLVARPk8oXjsP5utP8wYAnZePPAkw1@clients",
"aud": "https://api.danillouz.dev/account",
"iat": 1560762850,
"exp": 1560849250,
"azp": "FHgLVARPk8oXjsP5utP8wYAnZePPAkw1",
"gty": "client-credentials"
}6. Creating the auth response
We’ll use verifiedData to create the authResponse:
"use strict"
const util = require("util")
const jwt = require("jsonwebtoken")
const jwksRSA = require("jwks-rsa")
const getToken = require("./get-token")
const verifyToken = require("./verify-token")
const { JWKS_URI, TOKEN_ISSUER, AUDIENCE } = process.env
const jwksClient = jwksRSA({
cache: true,
rateLimit: true,
jwksUri: JWKS_URI,
})
const getSigningKey = util.promisify(jwksClient.getSigningKey)
const verifyJwt = util.promisify(jwt.verify)
module.exports.verifyBearer = async (event) => {
try {
const token = getToken(event)
const verifiedData = await verifyToken(
token,
jwt.decode,
getSigningKey,
verifyJwt,
TOKEN_ISSUER,
AUDIENCE
)
const authResponse = {
principalId: verifiedData.sub,
policyDocument: {
Version: "2012-10-17",
Statement: [
{
Action: "execute-api:Invoke",
Effect: "Allow",
Resource: event.methodArn,
},
],
},
}
return authResponse
} catch (err) {
console.log("Authorizer Error: ", err)
throw new Error("Unauthorized")
}
}Principal identifier
The authResponse.principalId property must represent a unique (user) identifier associated with the token sent by the client. Auth0 provides this via the sub claim and ours has the value:
{
"iss": "https://danillouz.eu.auth0.com/",
"sub": "FHgLVARPk8oXjsP5utP8wYAnZePPAkw1@clients", // Principal ID
"aud": "https://api.danillouz.dev/account",
"iat": 1560762850,
"exp": 1560849250,
"azp": "FHgLVARPk8oXjsP5utP8wYAnZePPAkw1",
"gty": "client-credentials"
}Note that if you use an Auth0 test token (like we’ll do in a bit), the sub claim will be postfixed with @clients. This is because Auth0 automatically created a “Test Application” for us when we registered the Account API with them. And it’s via this application that we obtain the test token, obtained via the client credentials grant (specified by the gty claim).
In this case the test application represents a “machine” and not a user. But that’s okay because the machine has a unique identifier the same way a user would have (by means of a client ID). This means that this implementation will also work when using “user centric” auth flows like the implicit grant.
You can find the test application in the Auth0 dashboard by navigating to “Applications” and selecting “Account API (Test Application)“.
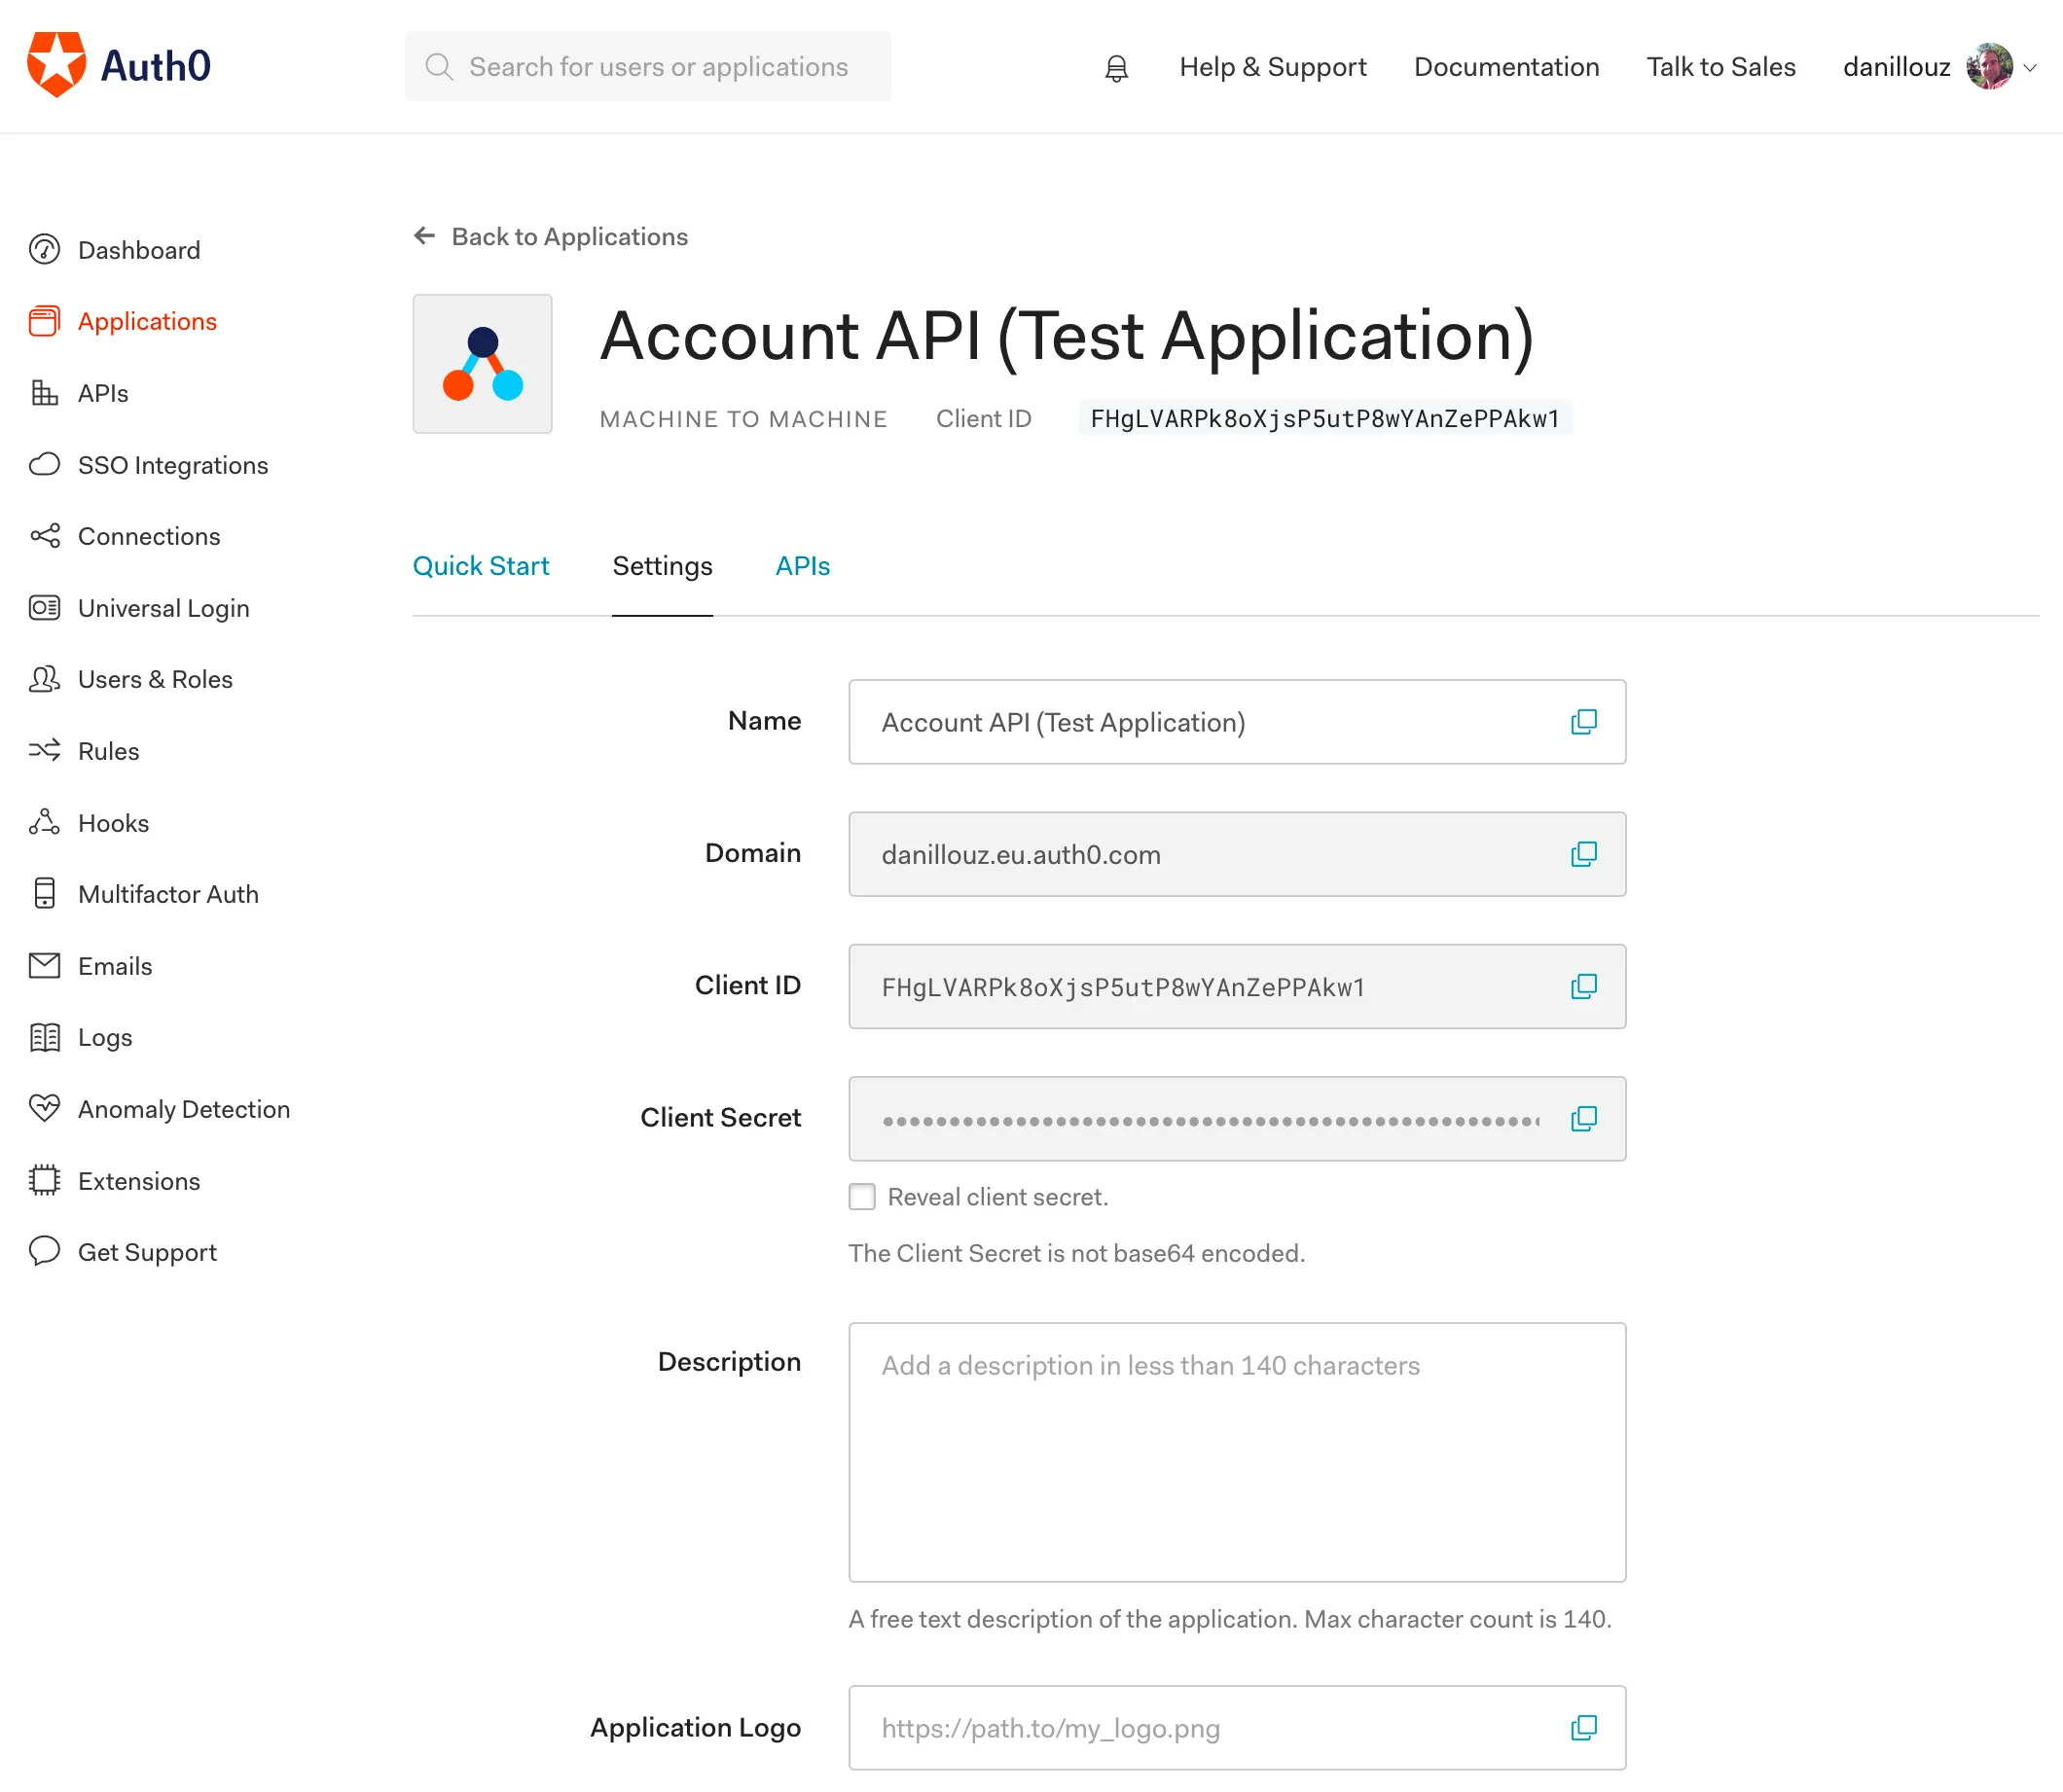
The client ID is
FHgLVARPk8oXjsP5utP8wYAnZePPAkw1, which
matches the JWT sub claim.
Method ARN
The ARN of the Lambda handler associated with the called endpoint can be obtained from event.methodArn. APIG will use this ARN to invoke said Lambda handler. In our case this will be the Lambda handler that gets the profile data.
Granting a client scopes
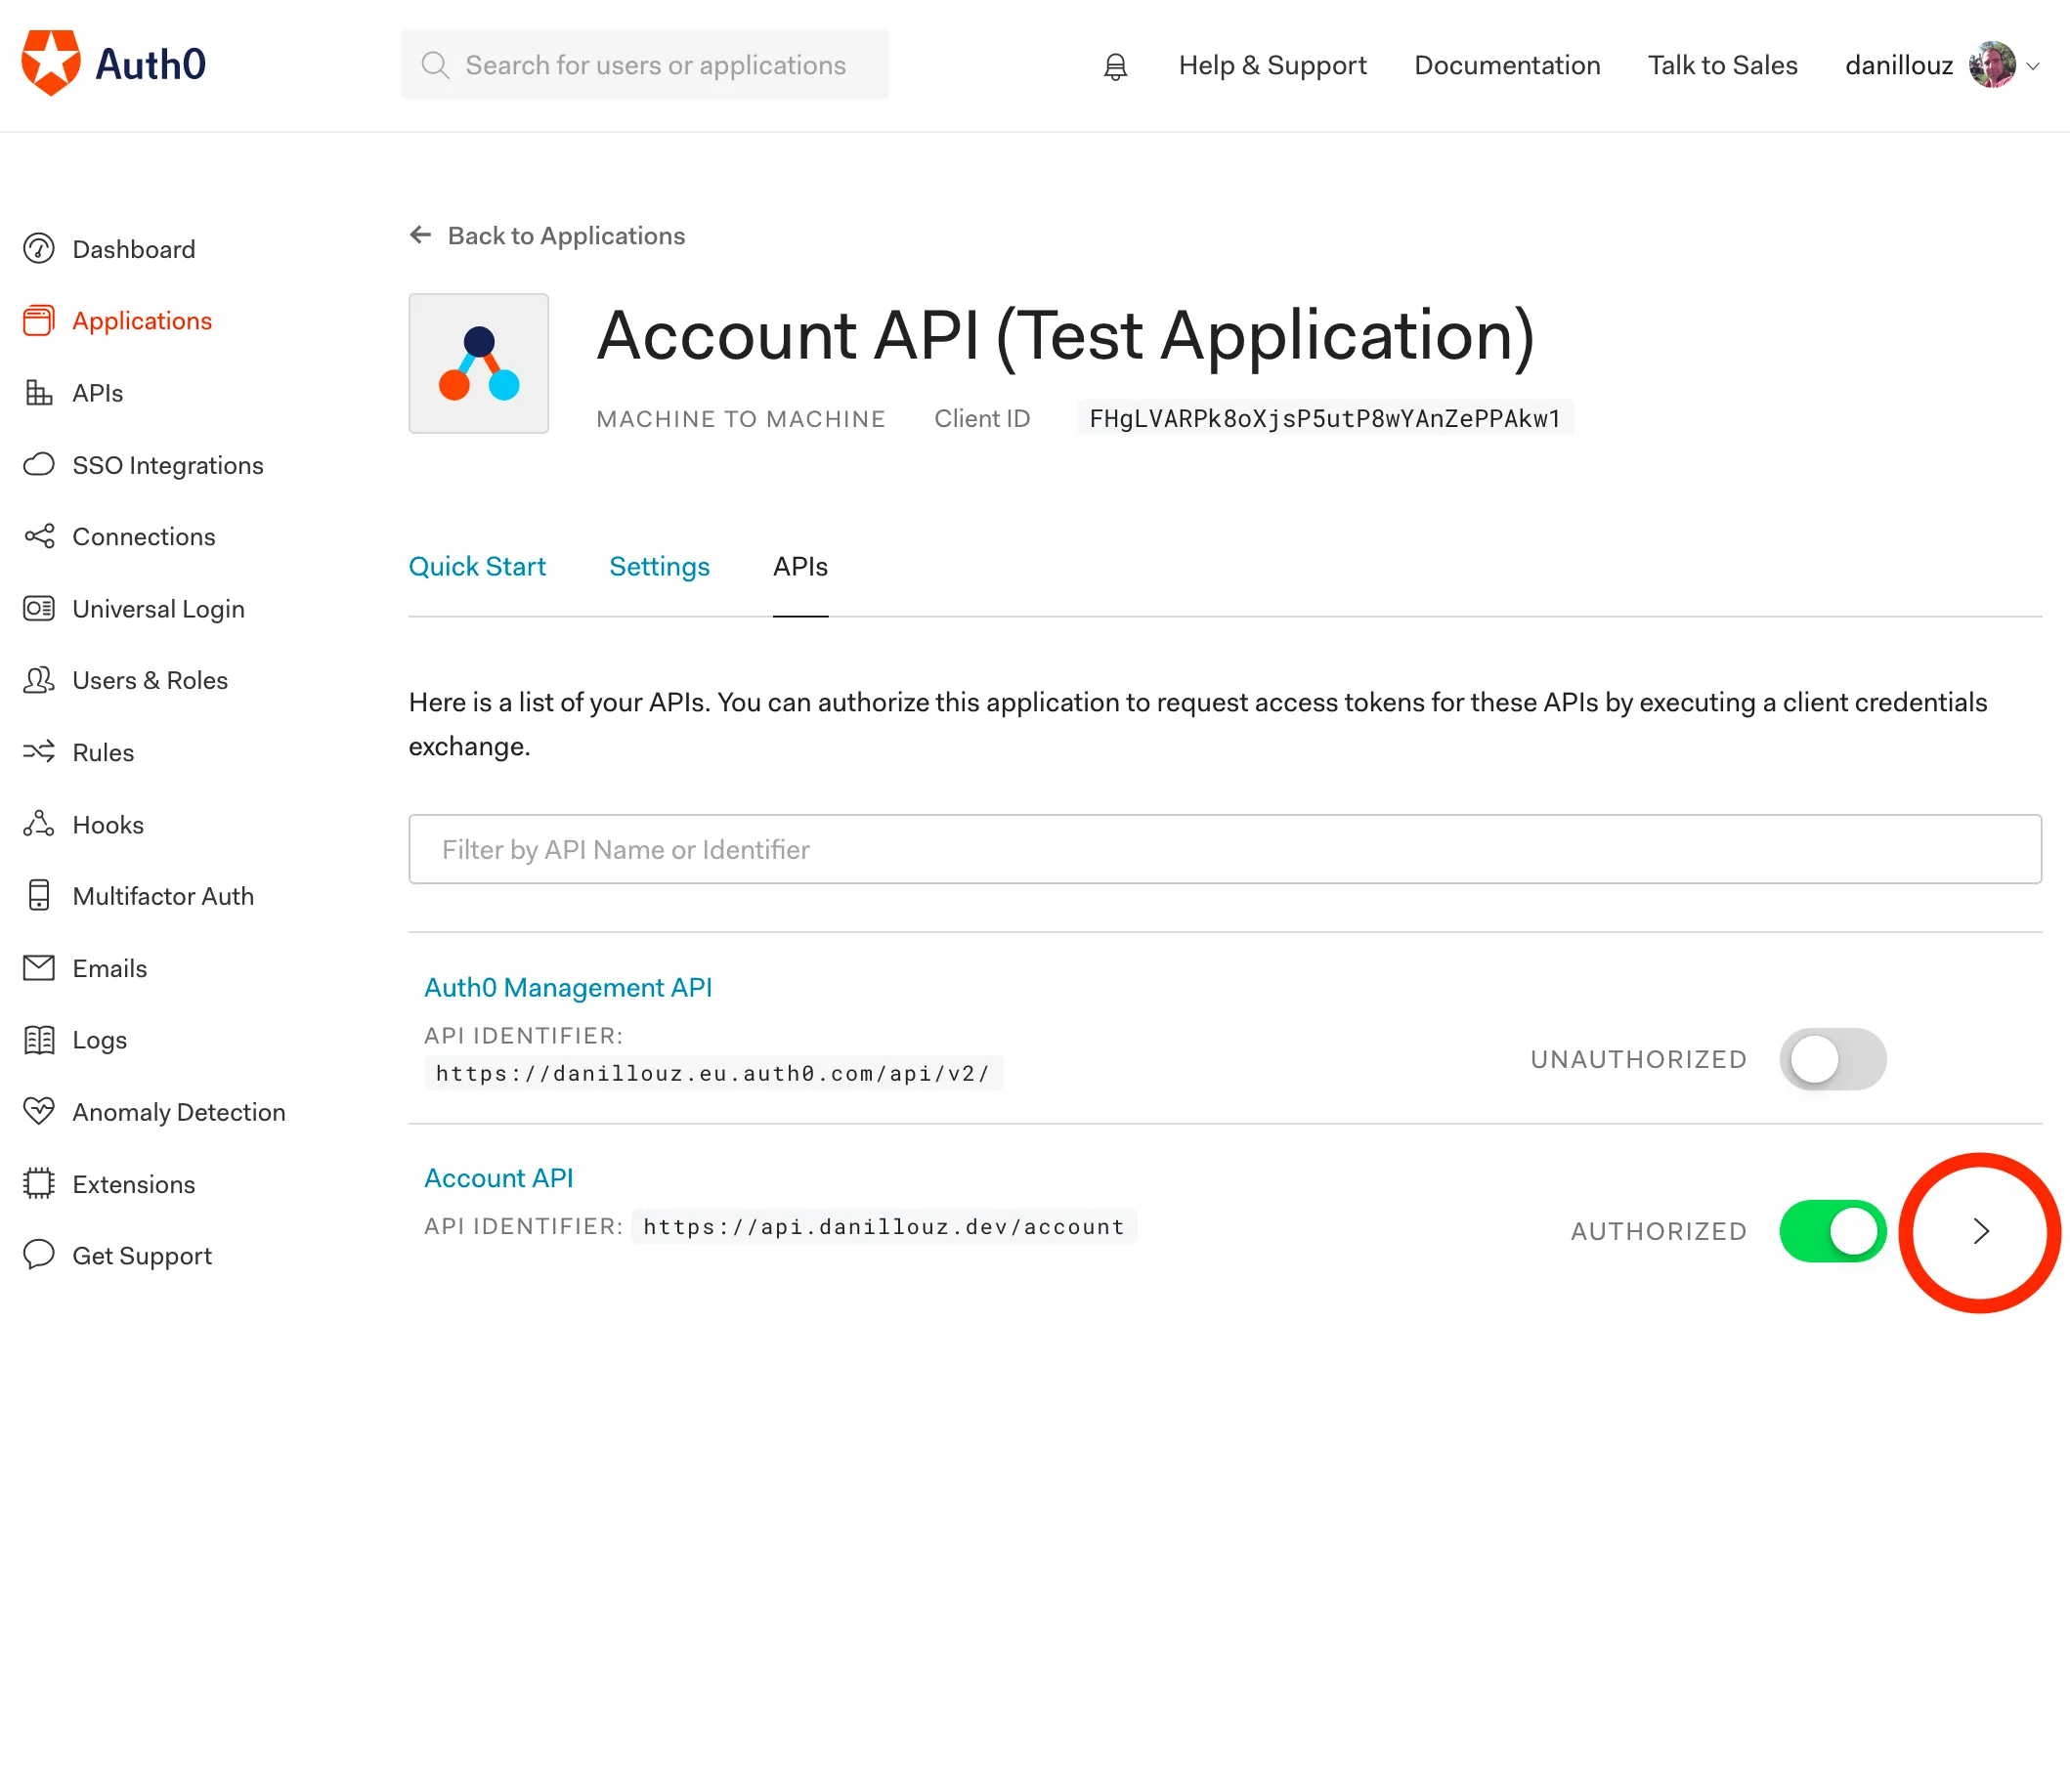
Like mentioned when discussing scopes, Auth0 can provide scopes as authorization information. In order for Auth0 to do this, we need to “grant” our client the get:profile scope. In our case, the client is the “Test Application” that has been created for us.
Navigate to the “APIs” tab in the “Test Application” details and click on the “right pointing chevron” (circled in red) to the right of “Account API”.
Then check the get:profile scope, click “Update” and click “Continue”.
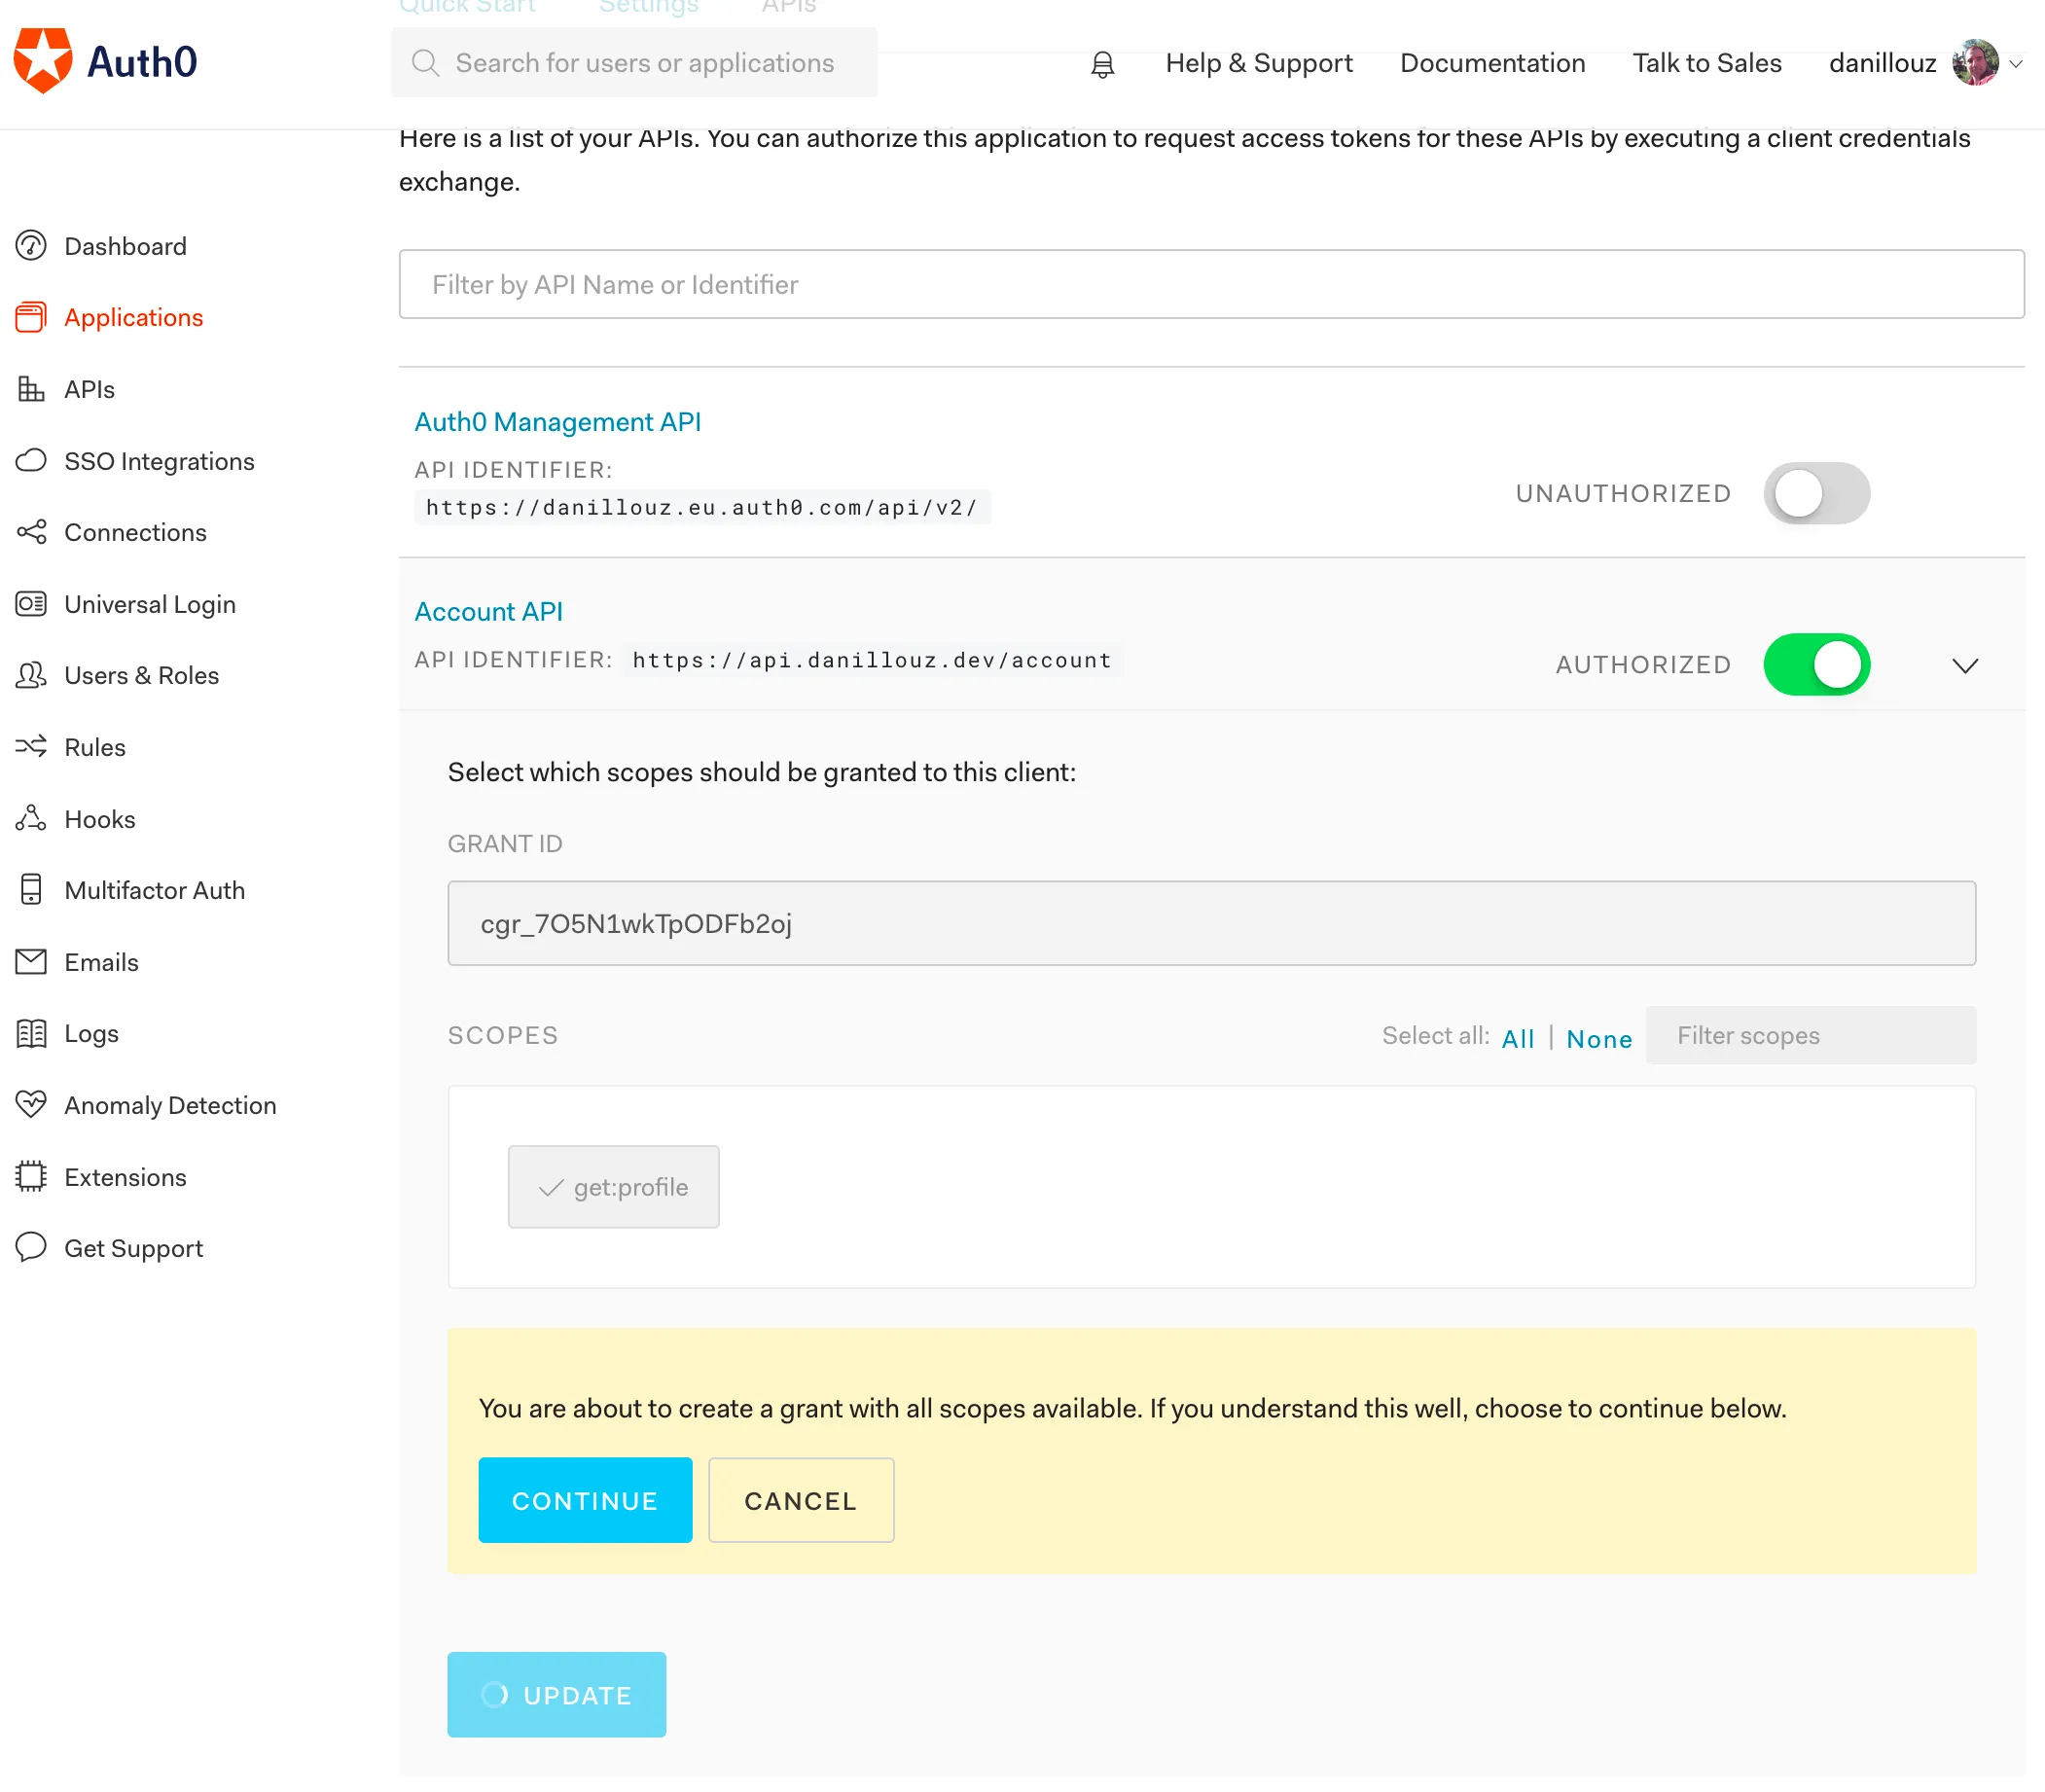
Grant the get:profile scope.
Now the configured scope will be a claim on issued test tokens, and part of the verifiedData:
{
"iss": "https://danillouz.eu.auth0.com/",
"sub": "FHgLVARPk8oXjsP5utP8wYAnZePPAkw1@clients",
"aud": "https://api.danillouz.dev/account",
"iat": 1560762850,
"exp": 1560849250,
"azp": "FHgLVARPk8oXjsP5utP8wYAnZePPAkw1",
"scope": "get:profile", // Scope is now a claim
"gty": "client-credentials"
}So we can propagate it to downstream Lambda handlers like this:
"use strict"
const util = require("util")
const jwt = require("jsonwebtoken")
const jwksRSA = require("jwks-rsa")
const getToken = require("./get-token")
const verifyToken = require("./verify-token")
const { JWKS_URI, TOKEN_ISSUER, AUDIENCE } = process.env
const jwksClient = jwksRSA({
cache: true,
rateLimit: true,
jwksUri: JWKS_URI,
})
const getSigningKey = util.promisify(jwksClient.getSigningKey)
const verifyJwt = util.promisify(jwt.verify)
module.exports.verifyBearer = async (event) => {
try {
const token = getToken(event)
const verifiedData = await verifyToken(
token,
jwt.decode,
getSigningKey,
verifyJwt,
TOKEN_ISSUER,
AUDIENCE
)
const authResponse = {
principalId: verifiedData.sub,
policyDocument: {
Version: "2012-10-17",
Statement: [
{
Action: "execute-api:Invoke",
Effect: "Allow",
Resource: event.methodArn,
},
],
},
context: {
scope: verifiedData.scope, // Propagate scope downstream
},
}
return authResponse
} catch (err) {
console.log("Authorizer Error: ", err)
throw new Error("Unauthorized")
}
}7. Releasing the Lambda Authorizer
Finally, add a release command to the package.json:
{
"scripts": {
"test": "echo \"Error: no test specified\" && exit 1",
"release": "serverless deploy --stage prod"
},
"dependencies": {
"jsonwebtoken": "^8.5.1",
"jwks-rsa": "^1.5.1"
},
"devDependencies": {
"serverless": "^1.45.1"
}
}And to upload the Lambda to AWS, sign up and make sure you have your credentials configured. Then release the Lambda by running npm run release:
Serverless: Packaging service...
Serverless: Excluding development dependencies...
Serverless: Creating Stack...
Serverless: Checking Stack create progress...
Serverless: Stack create finished...
Serverless: Uploading CloudFormation file to S3...
Serverless: Uploading artifacts...
Serverless: Uploading service lambda-authorizers.zip file to S3...
Serverless: Validating template...
Serverless: Updating Stack...
Serverless: Checking Stack update progress...
Serverless: Stack update finished...
Service Information
service: lambda-authorizers
stage: prod
region: eu-central-1
stack: lambda-authorizers-prod
resources: 5
api keys:
None
endpoints:
None
functions:
auth0VerifyBearer: lambda-authorizers-prod-auth0VerifyBearer
layers:
NoneFinding the ARN
Now go to the AWS Console and visit the “Lambda” service. Find lambda-authorizers-prod-auth0VerifyBearer under “Functions” and take note of the ARN in the top right corner.

We’ll need this to configure the Account API in the next part.
Implementing the Account API
We’ll do this by:
- Setting up the API project
- Configuring the Serverless manifest
- Defining the Lambda handler
- Releasing the API
- Configuring the Lambda Authorizer
- Adding authorization logic
- Releasing the API with auth enabled
- Getting a test token
1. Setting up the API project
Similar to the Lambda Authorizer, create a new directory for the code:
mkdir account-apiMove to this directory and initialize a new npm project with:
npm init -yThis creates a package.json file. Again, we’ll use the Serverless Framework to configure and upload the Lambda to AWS, so install it as a dev dependency:
npm i -D serverless2. Configuring the Serverless manifest
Create a Serverless manifest, and add the Lambda function definition for the GET /profile endpoint handler:
service: account-api
provider:
name: aws
runtime: nodejs8.10
stage: ${opt:stage, 'prod'}
region: ${opt:region, 'eu-central-1'}
memorySize: 128
timeout: 3
package:
exclude:
- ./*
- ./**/*.test.js
include:
- node_modules
- src
functions:
getProfile:
handler: src/handler.getProfile
description: Gets the user profile data
events:
- http:
path: /profile
method: get3. Defining the Lambda handler
In order to match the Lambda function definition in the Serverless manifest, create a file named handler.js in src. And in that file export a method named getProfile:
"use strict"
module.exports.getProfile = async () => {
try {
// Lambda handler implementation goes here.
} catch (err) {
const statusCode = err.code || 500
return {
statusCode,
body: JSON.stringify({
message: err.message,
info: err.info,
}),
}
}
}If something goes wrong in the Lambda, we’ll return an error response as HTTP output back to the caller.
Otherwise we’ll return the profile data:
"use strict"
module.exports.getProfile = async () => {
try {
const profileData = {
name: "Daniël",
}
return {
statusCode: 200,
body: JSON.stringify(profileData),
}
} catch (err) {
const statusCode = err.code || 500
return {
statusCode,
body: JSON.stringify({
message: err.message,
info: err.info,
}),
}
}
}Before we enable auth, let’s first release the API to see if we can call the endpoint.
4. Releasing the API
Add a release command to the package.json:
{
"scripts": {
"test": "echo \"Error: no test specified\" && exit 1",
"release": "serverless deploy --stage prod"
},
"devDependencies": {
"serverless": "^1.45.1"
}
}Then release the Lambda by running npm run release:
Serverless: Packaging service...
Serverless: Excluding development dependencies...
Serverless: Creating Stack...
Serverless: Checking Stack create progress...
Serverless: Stack create finished...
Serverless: Uploading CloudFormation file to S3...
Serverless: Uploading artifacts...
Serverless: Uploading service account-api.zip file to S3...
Serverless: Validating template...
Serverless: Updating Stack...
Serverless: Checking Stack update progress...
Serverless: Stack update finished...
Service Information
service: account-api
stage: prod
region: eu-central-1
stack: account-api-prod
resources: 10
api keys:
None
endpoints:
GET - https://9jwh.execute-api.eu-central-1.amazonaws.com/prod/profile
functions:
getProfile: account-api-prod-getProfile
layers:
NoneNow try to call the endpoint that has been created for you. For example:
curl https://9jwh.execute-api.eu-central-1.amazonaws.com/prod/profileIt should return:
200 OK
Content-Type: application/json

{
  "name": "Daniël"
}5. Configuring the Lambda Authorizer
Now we know the endpoint is working, we’ll protect it by adding a custom authorizer property in the serverless.yaml manifest:
service: account-api
custom:
authorizer:
arn: LAMBDA_AUTHORIZER_ARN
resultTtlInSeconds: 0
identitySource: method.request.header.Authorization
identityValidationExpression: '^Bearer [-0-9a-zA-z\.]*$'
type: token
provider:
name: aws
runtime: nodejs8.10
stage: ${opt:stage, 'prod'}
region: ${opt:region, 'eu-central-1'}
memorySize: 128
timeout: 3
profile: danillouz
package:
exclude:
- ./*
- ./**/*.test.js
include:
- node_modules
- src
functions:
getProfile:
handler: src/handler.getProfile
description: Gets the user profile
events:
- http:
path: /profile
method: get
authorizer: ${self:custom.authorizer}Let’s go over the authorizer properties:
arn: must be the value of the Lambda Authorizer ARN we released before.resultTtlInSeconds: used to cache the IAM Policy document returned from the Lambda Authorizer6.identitySource: where APIG should “look” for the bearer token.identityValidationExpression: the expression used to extract the token from theidentitySource.
6. Adding authorization logic
Now the Lambda Authorizer is configured and we also propagate the get:profile scope from the Lambda Authorizer, we can check if a caller has been granted the required scope. If not, we’ll return a 403 Forbidden response back to the caller:
"use strict"
const REQUIRED_SCOPE = "get:profile"
module.exports.getProfile = async (event) => {
try {
const { authorizer = {} } = event.requestContext
const { scope = "" } = authorizer
const hasScope = scope.split(" ").includes(REQUIRED_SCOPE)
if (!hasScope) {
const err = new Error("Forbidden")
err.code = 403
err.info = 'scope "get:profile" is required'
throw err
}
const profileData = {
name: "Daniël",
}
return {
statusCode: 200,
body: JSON.stringify(profileData),
}
} catch (err) {
const statusCode = err.code || 500
return {
statusCode,
body: JSON.stringify({
message: err.message,
info: err.info,
}),
}
}
}Note that the authorizer.scope is a string and that it may contain more than one scope value. When multiple scopes are configured, they will be space separated like this:
"get:profile update:profile"7. Releasing the API with auth enabled
Do another release by running npm run release. And after Serverless finishes, go to the AWS Console and visit the “API Gateway” service. Navigate to “prod-account-api” and click on the “GET” resource under “/profile”. You should now see that the “Method Request” tile has a property “Auth” set to auth0VerifyBearer.
The resource is now configured with a custom authorization scheme.
This means our GET /profile endpoint is properly configured with a Lambda Authorizer. And we now require a bearer token to get the profile data. Let’s verify this by making the same curl request like before (without a token):
curl https://9jwh.execute-api.eu-central-1.amazonaws.com/prod/profileIt should return:
401 Unauthorized
Content-Type: application/json
{
"message": "Unauthorized"
}8. Getting a test token
We can get a test token from the Auth0 dashboard by navigating to the “Test” tab in the API details screen.
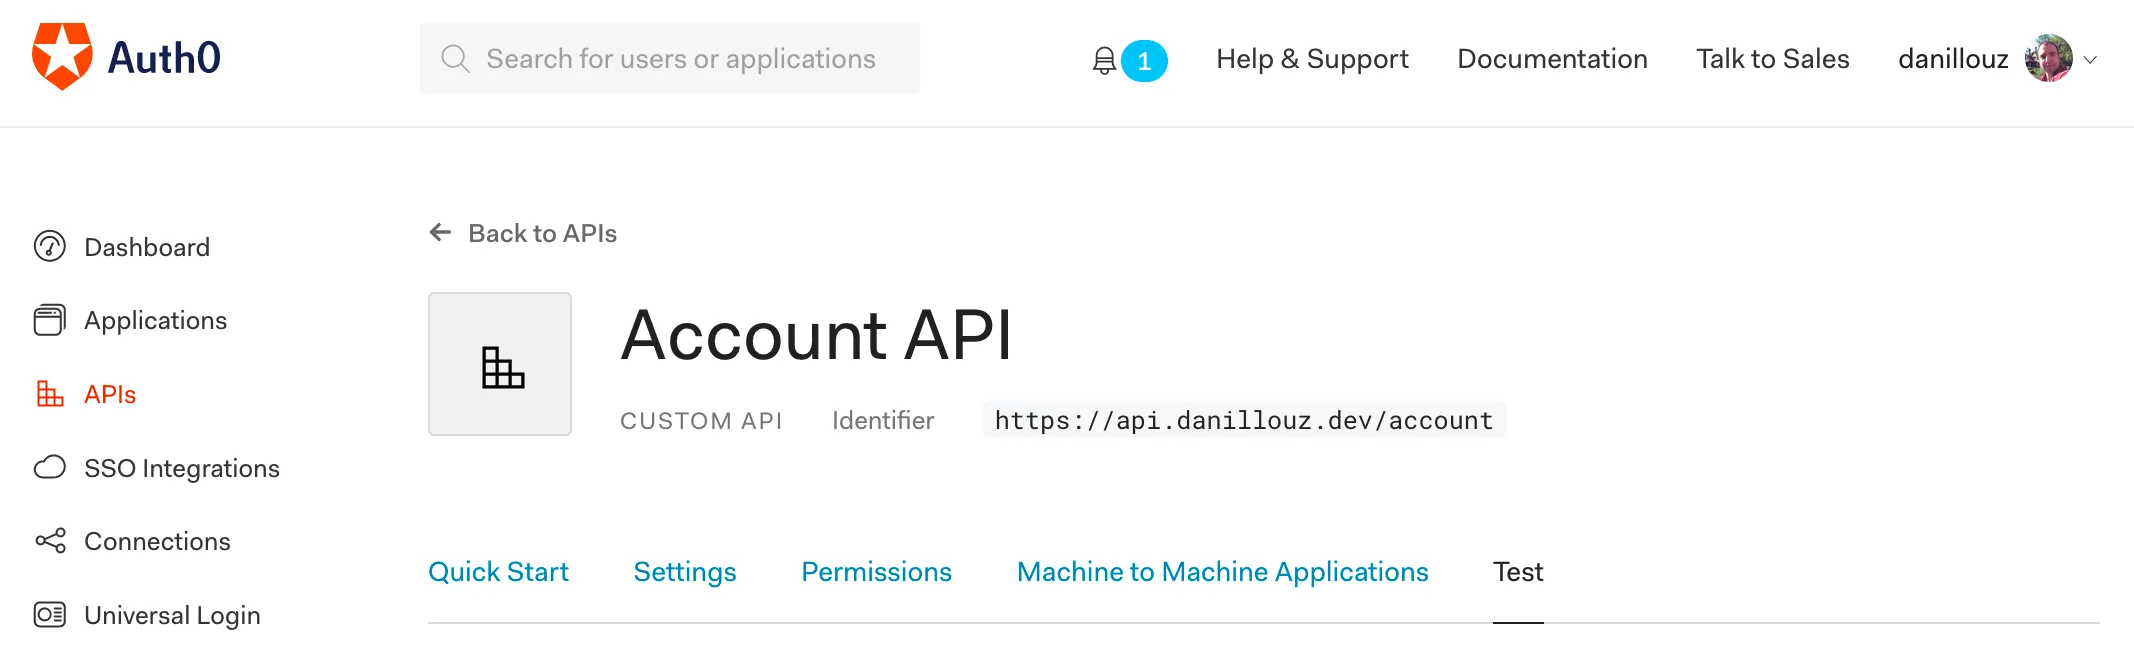
If you scroll to the bottom, you’ll see a curl command displayed with a ready to use test token:
curl --request GET \
--url http://path_to_your_api/ \
--header 'authorization: Bearer eyJ...lKw'Pretty cool right! Use this, but set the URL to your profile endpoint. For example:
curl --request GET \
--url https://9jwh.execute-api.eu-central-1.amazonaws.com/prod/profile \
--header 'authorization: Bearer eyJ...lKw'This should return the profile data again:
200 OK
Content-Type: application/json

{
  "name": "Daniël"
}Also, sending a token without the required scope should return a 403:
403 Forbidden
Content-Type: application/json

{
  "message": "Error: Forbidden",
  "info": "scope \"get:profile\" is required"
}
Awesome! We successfully secured our API with a token based authentication strategy. So only authenticated and authorized clients can access it now!
CORS headers
On a final note, when your API needs to return CORS headers, make sure to add a custom APIG Response as well:
service: account-api

custom:
  authorizer:
    arn: LAMBDA_AUTHORIZER_ARN
    resultTtlInSeconds: 0
    identitySource: method.request.header.Authorization
    identityValidationExpression: '^Bearer [-0-9a-zA-z\.]*$'
    type: token

provider:
  name: aws
  runtime: nodejs8.10
  stage: ${opt:stage, 'prod'}
  region: ${opt:region, 'eu-central-1'}
  memorySize: 128
  timeout: 3

package:
  exclude:
    - ./*
    - ./**/*.test.js
  include:
    - node_modules
    - src

functions:
  getProfile:
    handler: src/handler.getProfile
    description: Gets the user profile
    events:
      - http:
          path: /profile
          method: get
          authorizer: ${self:custom.authorizer}

resources:
  Resources:
    GatewayResponseDefault4XX:
      Type: "AWS::ApiGateway::GatewayResponse"
      Properties:
        ResponseParameters:
          gatewayresponse.header.Access-Control-Allow-Origin: "'*'"
          gatewayresponse.header.Access-Control-Allow-Headers: "'*'"
        ResponseType: DEFAULT_4XX
        RestApiId:
          Ref: "ApiGatewayRestApi"
    GatewayResponseDefault5XX:
      Type: "AWS::ApiGateway::GatewayResponse"
      Properties:
        ResponseParameters:
          gatewayresponse.header.Access-Control-Allow-Origin: "'*'"
          gatewayresponse.header.Access-Control-Allow-Headers: "'*'"
        ResponseType: DEFAULT_5XX
        RestApiId:
          Ref: "ApiGatewayRestApi"
When the Lambda Authorizer throws an error or returns a “Deny” policy, APIG will not execute any Lambda handlers. This means that the CORS settings you added to the Lambda handler wont be applied. That’s why we must define additional APIG response resources, to make sure we always return the proper CORS headers.
In closing
In this post I showed a way to implement “serverless auth” using a machine client. But you can use something like Auth0 Lock and implement a user centric auth flow. This would allow users to sign up and log in to (for example) a web app, and get a token from Auth0. The web app can then use the token to send requests (on behalf of a user) to a protected API.
You can find all code at github.com/danillouz/serverless-auth.
Footnotes
-
However, building an auth service yourself is a great learning experience. I think it’s quite fun and challenging. And more importantly, you’ll get a deeper understanding of the subject, which will be very helpful when you’re navigating the “documentation jungle” of your favorite auth provider. ↩
-
The “Identifier” doesn’t have to be a “real” endpoint. ↩
-
We get the JWKS URI, issuer and audience values from the Lambda Authorizer configuration. ↩
-
The thrown error message must match the string
"Unauthorized"exactly for this to work. ↩ -
Caching is disabled when set to
0. When caching is enabled and a policy document has been cached, the Lambda Authorizer will not be executed. According to the AWS docs the default value is300seconds and the max value is3600seconds. ↩
Webmentions
Loading...
Thanks for reading!
If you have ideas how to improve this post, let me know on GitHub.
Post last updated